Amaryllis Ferrari is a stunning Hippeastrum cultivar that produces deep, velvety red blooms on thick stems, and the good news is that it's one of the more forgiving bulb flowers you can grow indoors. If you want a similar water-growing experience, learn how to grow carnations in water without stressing the roots bulb flowers. You start from a bulb (not seed), plant it with the top third poking above the soil, keep it warm and bright, and within 6 to 10 weeks you'll have flowers. The trickier part, and what most guides skip over, is getting it to bloom again the following year. That takes a deliberate rest cycle, and once you understand it, repeat blooms are very achievable.
How to Grow Amaryllis Ferrari: Step-by-Step Care to Rebloom

Marcus Holloway
4 Jun 2026

What exactly is amaryllis Ferrari (and why you want a bulb, not a seed)

The plant sold as 'Amaryllis Ferrari' is botanically a Hippeastrum, listed by the Chicago Botanic Garden as Hippeastrum 'Ferrari Red.' Like most plants in the Hippeastrum family, it's sold and grown as a bulb rather than a seed. UMN Extension also notes that amaryllis (Hippeastrum sold as “amaryllis”) is typically purchased as bulbs, either bare bulbs or pre-potted, and grown indoors for their flower stalks sold and grown as a bulb rather than a seed. You'll find it as a bare bulb from bulb retailers or pre-potted in a kit from garden centers, and both work fine.
Growing from seed is technically possible but not practical for home gardeners. If you’re wondering about stem-based propagation, that’s a different approach than seeds, and it’s usually easier to plan around cuttings or divisions than trying to start from Hippeastrum seed can you grow carnation from stem. Hippeastrum seeds are large, somewhat fussy to germinate, and take three to five years before the plant produces a single flower. Bulbs, on the other hand, are fully mature plants in storage mode. A good-sized Ferrari bulb (look for 26 cm circumference or larger) can throw up two flower stems with three to five blooms each. Bigger bulb means more flowers, which is worth remembering when you're picking between bulb sizes at checkout.
When to plant: forcing for winter blooms vs. the natural season
One of the best things about Ferrari amaryllis is that you can control when it blooms. Since it's a non-hardy bulb grown indoors in most of North America, there's no hard rule about waiting for spring. Amaryllis Ferrari is sold as a non-hardy indoor-forcing bulb, which is why it is typically grown indoors in North America rather than relying on outdoor spring timing non-hardy bulb grown indoors. You're essentially forcing it, the same way you'd force a paperwhite narcissus.
For Christmas or holiday blooms, pot your bulb in late October to mid-November. For late winter color in February or March, pot it in December or January. If you just bought a bulb and it's June, pot it now and enjoy summer blooms on a windowsill. Ferrari will flower roughly 6 to 10 weeks after potting, depending on warmth and light. The warmer and brighter the spot, the faster it moves. You can even stagger a few bulbs two weeks apart for a longer bloom season, which is a trick worth using if you have the space.
The right pot, potting mix, and planting depth
Pot size matters more than most people expect with amaryllis. Ferrari bulbs do best slightly snug in their container. Choose a pot that leaves about one inch of space between the bulb and the pot wall on each side. A 6- to 7-inch pot is usually right for a standard bulb. The pot must have drainage holes, full stop. Hippeastrum bulbs are very prone to basal rot if they sit in water.
For the mix, use a well-draining potting compost. A standard peat or coir-based potting mix works, but you'll get better results if you mix in about 20 to 25 percent perlite to improve drainage. Heavy or moisture-retentive mixes are the number one cause of rot. Avoid garden soil entirely.
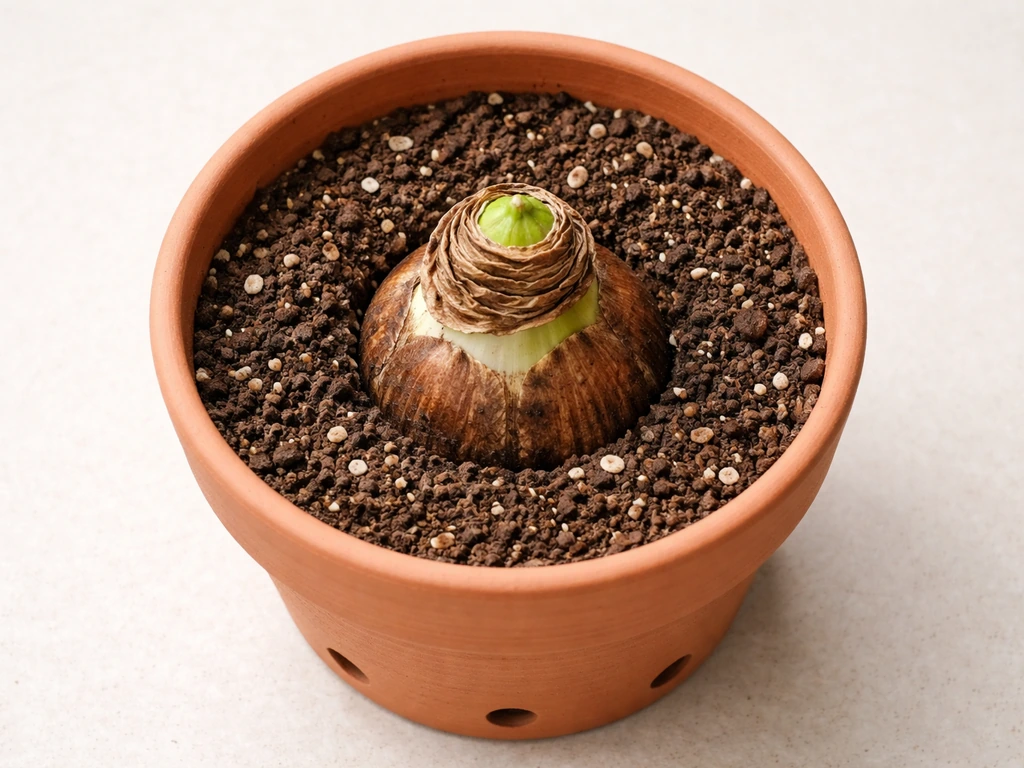
Planting depth is where beginners often go wrong. Plant the bulb so that the top third (roughly the top inch to inch and a half) sits above the soil surface. Don't bury it completely. The neck and shoulders should be visible. Press the mix firmly around the bulb so it stands upright, then place a thin layer of mix on top of the roots only. Position the bulb in the center of the pot, pointed end up.
- Fill the pot one-third full with your perlite-amended potting mix.
- Place the bulb in the center and hold it at the right height so the top third will sit above the final soil level.
- Fill in around the roots, firming gently but not packing hard.
- Leave the top third of the bulb exposed above the soil.
- Water once, lightly, just to settle the mix, then stop watering until you see growth.
Light, temperature, watering, and feeding during growth and bloom
Light and temperature
Keep the newly potted bulb in a warm spot, around 70 to 75°F (21 to 24°C), while you're waiting for the shoot to emerge. A spot near a heat source or on top of the refrigerator works well for this germination phase. Once you see the shoot appear, move it to your brightest window, ideally south- or west-facing, where it gets at least six hours of direct or strong indirect light. Too little light causes the stem to stretch and flop over. A leggy, floppy stem is almost always a light problem. Rotate the pot a quarter turn every few days to keep the stem growing straight.
Watering
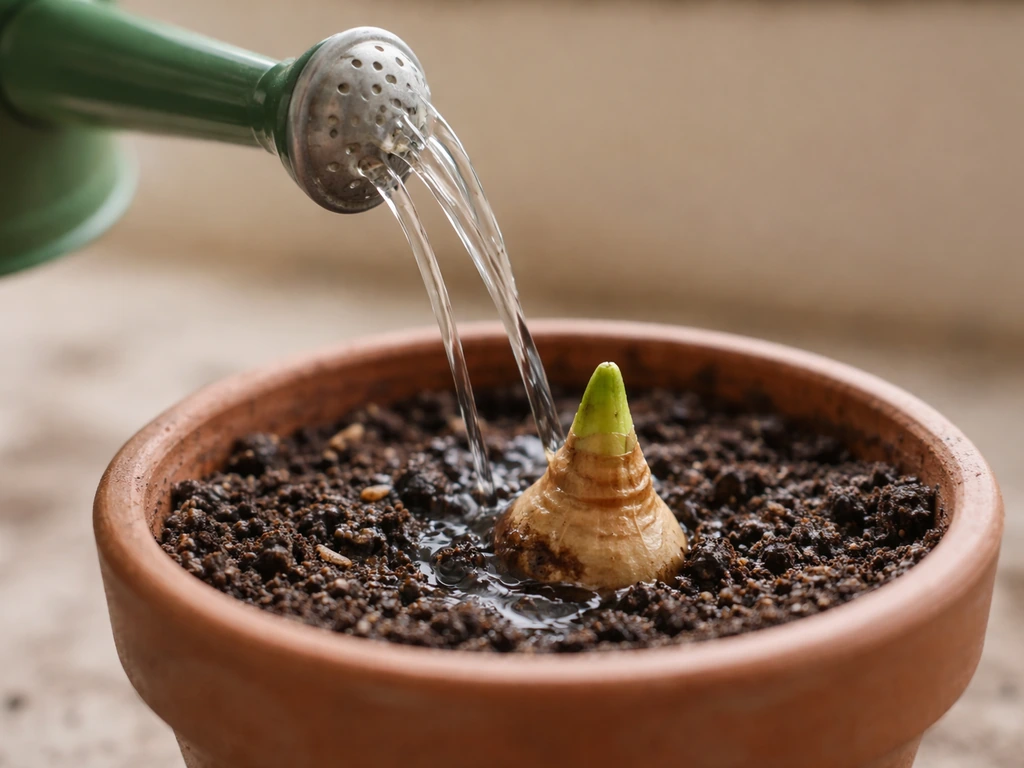
This is the most critical skill to get right. After that initial light watering at planting, hold off on watering again until you clearly see the shoot poking out, usually one to three weeks later. Before you see growth, watering too much encourages the bulb to rot before it even starts. Once the shoot is 2 to 3 inches tall, begin watering normally. Water thoroughly, then let the top inch of mix dry out before watering again. During active growth and flowering, Ferrari stays fairly thirsty, but it still hates sitting in wet soil. Always empty the saucer after watering.
Feeding
Don't fertilize during the initial forcing phase when the bulb is drawing on its own stored energy. Once the flower stem is well up and the leaves start growing (usually after the first bloom opens), begin feeding with a balanced liquid fertilizer at half strength every two weeks. Switch to a high-potassium fertilizer (tomato or bloom feed works perfectly) during active flowering and continuing through the growing season afterward. This potassium-rich feeding is what helps the bulb rebuild its energy reserves for next year's bloom, so don't skip this part.
How to get Ferrari amaryllis to rebloom

Getting a second bloom from your Ferrari bulb is absolutely doable, and it's the most rewarding part of the process. The key is giving the bulb a proper rest period, then waking it back up at the right time.
After the flowers fade
Once the flowers die, cut the flower stalk down to about 2 inches above the bulb. Don't cut the leaves. The leaves are now doing the work of photosynthesizing and rebuilding the bulb's energy stores. Move the pot to your brightest spot, keep watering regularly, and continue your high-potassium feeding every two weeks. If weather permits, you can move the pot outside for summer, which gives the leaves even more light and speeds up the rebuilding process. If you want to learn how to grow carnations outdoors, focus on sunlight, soil drainage, and consistent watering move the pot outside for summer. Treat the plant like any other foliage houseplant during this phase.
Triggering dormancy
About 8 to 10 weeks before you want the bulb to bloom again, stop watering completely and move the pot to a cool, dark spot, somewhere around 50 to 55°F (10 to 13°C). A basement, unheated spare room, or cool garage works well. The leaves will yellow and dry up. Let them. Once they're fully dry, pull them off cleanly. The bulb will now sit dormant for at least 8 to 10 weeks. Don't skip this cold, dark rest period. It's what resets the bulb's internal flowering clock.
Waking it back up
After the rest period, bring the pot back into a warm room and resume watering lightly. You should see a new shoot appear within two to four weeks. From that point, follow the same care routine as the first forcing cycle. Your Ferrari bulb should produce flowers every year with this approach, and the bulb may even multiply and produce offsets (small side bulbs) over time, which you can separate and grow on.
Common problems and how to fix them
| Problem | Likely Cause | Fix |
|---|---|---|
| No flowers or very slow to shoot | Too cold, not enough light, or rest period was skipped | Move to a warmer spot (70-75°F); ensure bright light; always complete the full 8-10 week dormancy next cycle |
| Stem is tall and floppy | Too little light during growth phase | Move to the brightest window available; rotate pot regularly; stake the stem with a thin cane |
| Leaves yellowing early (before dormancy) | Overwatering or poor drainage | Check drainage holes are clear; let the soil dry out more between waterings; reduce watering frequency |
| Bulb soft at base or dark rotted patches | Basal rot from sitting in wet soil or damaged bulb at purchase | Remove from pot; cut away any soft rotted tissue with a clean knife; dust with sulfur or cinnamon; repot in dry mix and hold off watering |
| Bulb not producing leaves after dormancy | Rest period too long, too warm, or bulb dried out too severely | Move back to warmth and resume light watering; wait 3-4 weeks; check bulb is still firm |
| White cottony patches on leaves or bulb neck | Mealybugs | Wipe off with a cotton swab dipped in 70% rubbing alcohol; treat with neem oil spray; repeat weekly |
| Red streaks on leaves or stems | Red blotch fungal disease (Stagonospora) | Remove affected tissue; avoid wetting the bulb neck when watering; improve air circulation; use a copper-based fungicide if severe |
Long-term storage and overwintering
You have two options for the dormant period: leave the bulb in its pot or store it bare. Leaving it in the pot is easiest and works well if you have a cool, dark spot where the pot won't be disturbed. Just make sure the mix is completely dry before storage or it will go moldy.
If you want to store the bulb bare, tip it out of the pot after the leaves have died back, brush off the dry soil, and let it air-dry for a day or two at room temperature. Store the bare bulb in a mesh bag or open paper bag at 50 to 55°F (10 to 13°C). Check it monthly. A healthy dormant bulb stays firm and papery. If you notice any soft spots developing, trim them back to clean tissue, dust with cinnamon (a natural antifungal), and move to a slightly drier spot.
Ferrari amaryllis bulbs are non-hardy and won't survive outdoor winters in most of North America. Keep them inside during the dormant period regardless of how warm your climate feels in fall. The cool temperature is part of the trigger for flowering, but freezing temperatures will kill the bulb.
Your next steps right now
If you're just getting started: order or pick up the largest Ferrari bulb you can find (aim for 26 cm or bigger), grab a 6- to 7-inch pot with drainage holes, mix some perlite into your potting compost, and plant with the top third of the bulb exposed. Put it somewhere warm until it shoots, then move it to your brightest window. That's really the whole first chapter.
If you already have a Ferrari that just finished blooming: don't cut the leaves. Feed it, give it light, and treat it like a houseplant for the next few months. You're now in the rebuilding phase, and what you do (or don't do) right now determines whether you get flowers again next year. Mark a calendar reminder 8 to 10 weeks before your target bloom date to start the dormancy process.
Ferrari is honestly one of the easier bulb flowers to master once you understand the rhythm of grow, rest, and regrow. If you want a similar approach for long stem carnations, focus on consistent light, steady watering, and pruning to keep the stems straight and tall. It shares that kind of structured seasonal cycle with other cut-flower favorites like carnations and alstroemerias, where understanding the plant's natural cycle is most of the battle. Carnations and alstroemerias have a similar rhythm, so the right grow, rest, and regrow approach also helps you learn how to grow alstroemerias successfully. If you want the same seasonal rhythm with carnations, learn how to grow carnations for steady blooms and healthy growth. Get the cycle right and this bulb will reward you with those bold red blooms year after year. If you're also interested in other small-flowered bloomers, you can compare this bulb rhythm with how to grow mini carnations for a similar home-garden approach relevant option.
FAQ
How do I know if my amaryllis Ferrari bulb is planted at the right depth?
The top third can be exposed, but the neck and shoulders should never end up under the potting mix. A quick check is to run your finger around the bulb, if you can’t feel a visible neck above the mix, the planting depth is likely too deep.
My Ferrari has leaves but no blooms, what should I troubleshoot first?
If you see leaf growth first and no flower spike by about 10 weeks after potting, increase light and double-check that you started the bulb from its full dormancy window. Also confirm the bulb is large enough (26 cm circumference or bigger) and that the room was warm enough during the forcing stage.
How much should I water a Ferrari during forcing, and how do I avoid rot?
Because Hippeastrum bulbs are prone to rot, the safest rule is to wait until you see a shoot before resuming watering, then water deeply only after the top inch dries. During active growth, use a saucer, water thoroughly, and always empty any leftover water after 10 to 15 minutes.
Can I move my amaryllis Ferrari outside to help it rebloom?
Yes, but only after the first bloom cycle, when the leaves are actively rebuilding the bulb. If you move it outside while the bulb is still forcing, sudden cold nights and heavy rain can slow growth or trigger rot, so choose a sheltered spot and bring it in if temperatures drop.
What causes flopping stems, and how can I fix them without damaging the bulb?
If the flower stem bends or flops, it is usually low-light during forcing or uneven growth from not rotating the pot. Make sure the plant receives at least six hours of strong indirect or direct light, rotate a quarter turn every few days, and consider a soft tie to a small stake if it is already leaning.
Should I cut the leaves after my Ferrari blooms?
After flowering, you cut only the flower stalk (down to around 2 inches above the bulb) and keep the leaves. Skipping leaf care or cutting leaves too early prevents the bulb from refilling energy stores, which is why next-year blooms fail.
What if I cannot keep my bulb at exactly 50 to 55°F during dormancy?
The dormancy temperature is a trigger, not just a time. Aim for about 50 to 55°F (10 to 13°C) and keep the pot in the dark, then stop watering fully. If your space runs warmer, extend the dry rest period a bit, but don’t skip the cool requirement entirely.
Can I leave my Ferrari in its pot during dormancy, and how dry should it be?
If the pot stays a little damp during dormancy, mold and rot are more likely. Let the mix become completely dry before moving to the cool dark spot, and if you store in the pot, don’t water at all during the rest window.
My amaryllis produced offsets, when should I separate them and will they bloom next year?
Yes, offsets can be separated once you see they have grown to form their own small bulbs and multiple roots. Wait until after the main plant has leafed out in its growing phase, then gently separate and repot into their own containers; expect smaller offsets to take a season or two longer to flower.
When should I start fertilizer, and what happens if I fertilize too early?
Forcing is fine, but overfeeding during the early phase can be counterproductive because the bulb is living off stored energy. Start feeding only after the first blooms open and leaves begin meaningful growth, use half-strength every two weeks, and switch to high-potassium once the flower stem is up.
Next Article
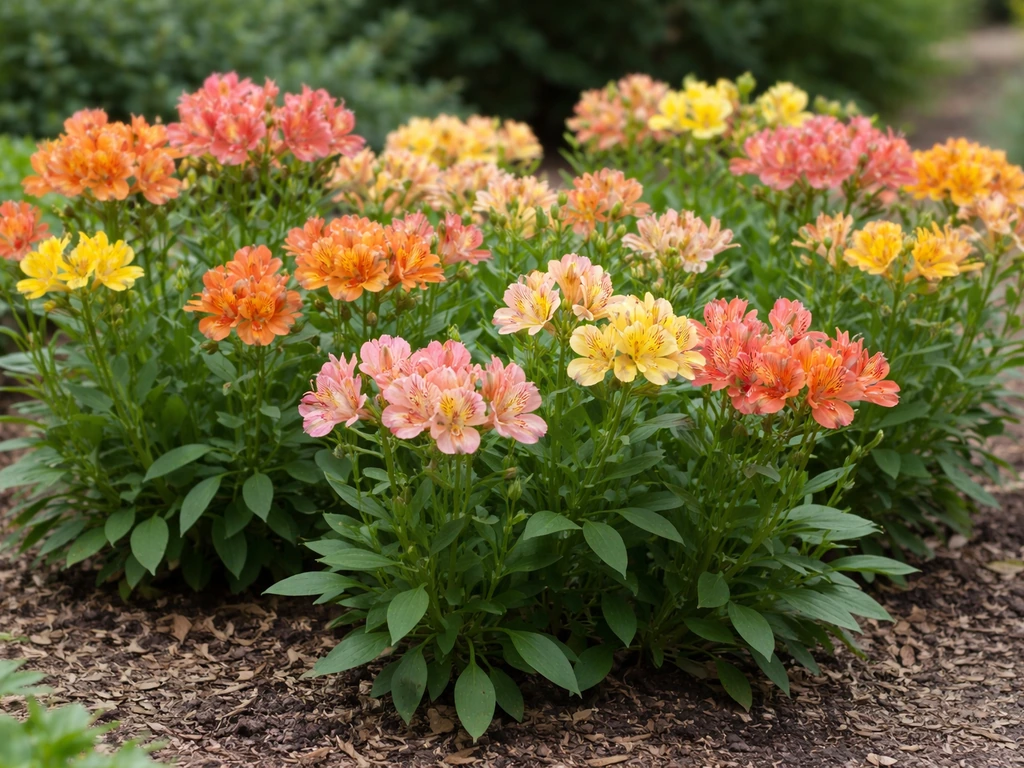
How to Grow Alstroemerias: Step-by-Step for Lots of Blooms
Step-by-step guide to growing alstroemerias for abundant blooms, from planting to watering, feeding, and troubleshooting