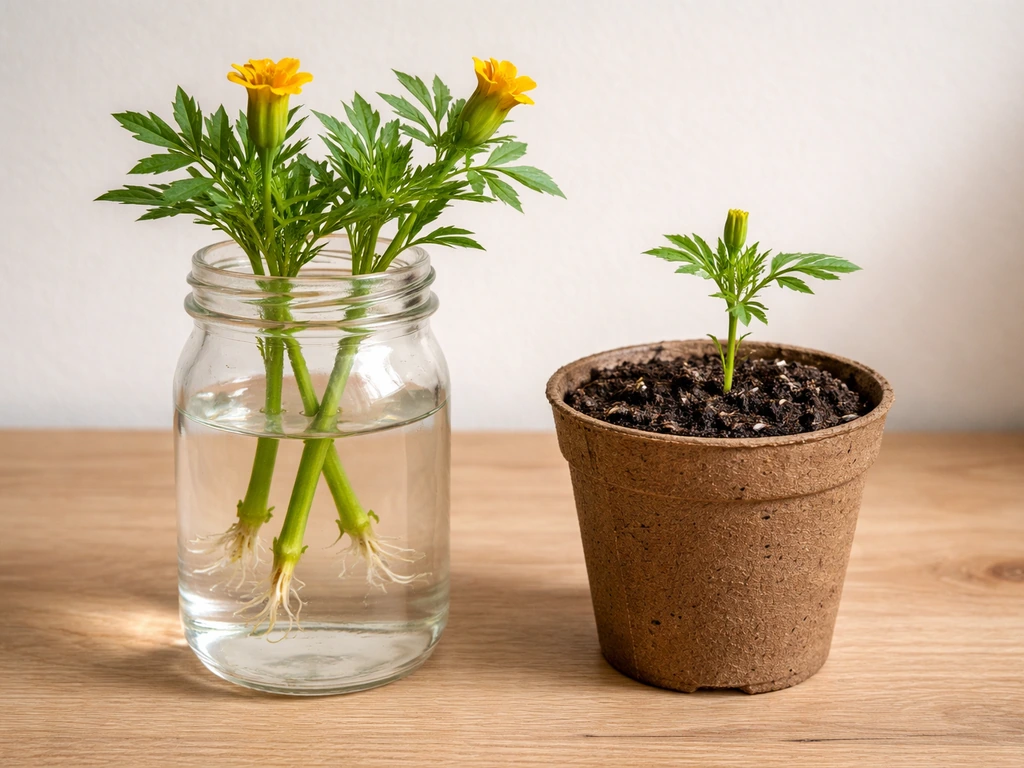
Yes, you can grow marigolds from a flower, but only from the seeds hiding inside a dried flower head, not from the petals themselves. The colourful petals are purely decorative and carry no embryo, so they won't sprout no matter how carefully you plant them. The real magic is in the small, slender seeds (technically called achenes) packed into the base of the bloom once it browns and dries. Pull those out, give them a warm spot and moist soil, and you'll have seedlings in as little as five to seven days.
Can You Grow Marigold From Flower? Seed & Propagation Guide

Marcus Holloway
7 Aug 2026
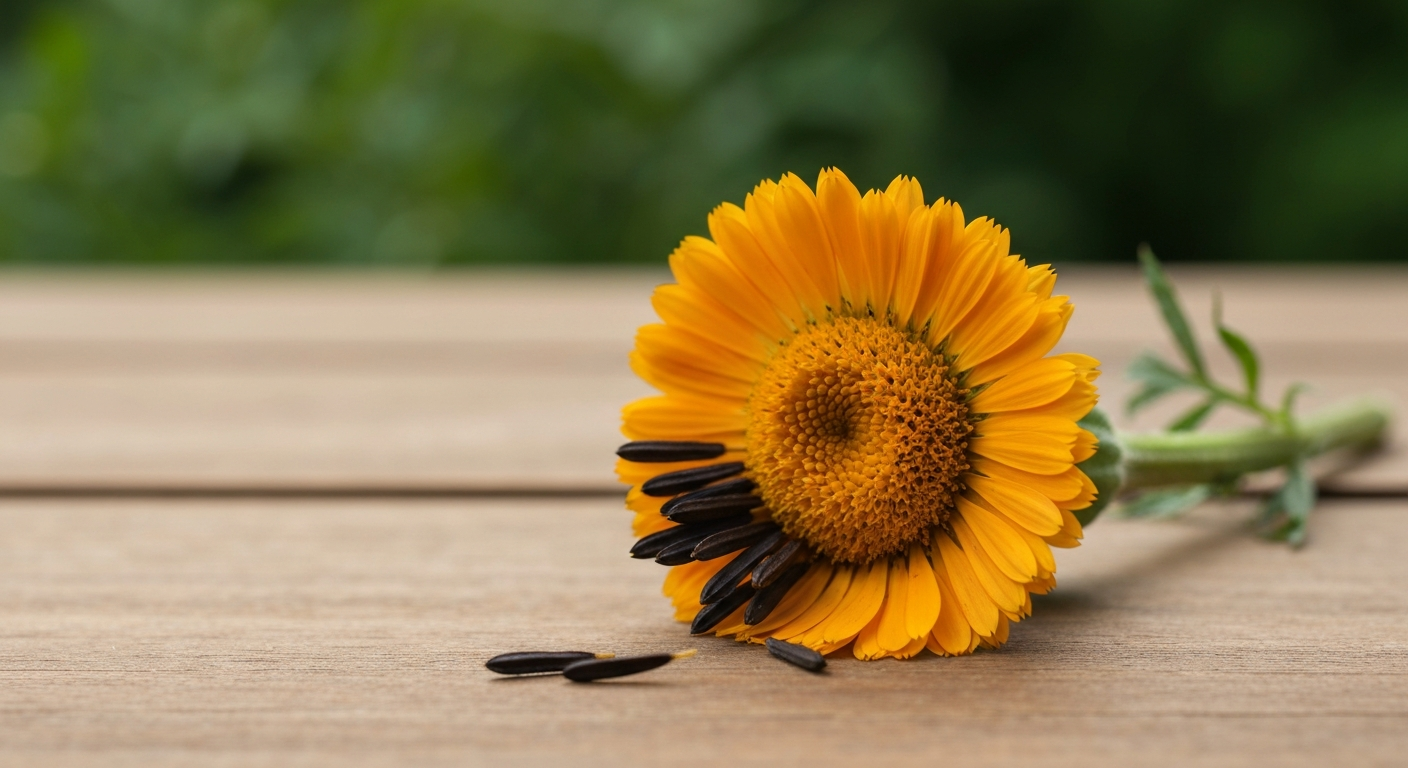
How marigolds reproduce: it's all in the dried flower base
Marigolds belong to the Asteraceae family, which means each flower head is actually a cluster of tiny individual flowers packed tightly together. The seeds develop at the base of that cluster, in a structure called the receptacle. As the bloom ages and dries, those one-seeded dry fruits (achenes or cypselae, if you want the botanical term) mature and harden. Members of the Asteraceae produce single-seeded dry fruits known as achenes or cypselae (achene/cypsela) which develop from the flower receptacle. What gardeners call a 'marigold seed' is really one of these narrow, crescent-shaped achenes, often with a papery tuft at one end.
The key takeaway: the reproductive part of the plant is at the centre base of the flower head, not in the showy petals at the top. Once the bloom fades and the base turns brown and papery, those seeds are ready to harvest. You can let them ripen right on the plant, or snip the heads and finish drying them indoors on a paper towel. Practical seed‑harvest method used by growers: let flower heads dry fully on the plant (or cut and dry indoors), remove the dried head and pull or rub the small crescent/curved achenes from the receptacle, then dry further on paper and store Let flower heads dry fully on the plant (or cut and dry indoors), then pull the small crescent achenes from the receptacle, dry them on paper, and store..
Why petals alone won't produce a new plant
I get asked this one a lot, usually by beginners who have pulled apart a spent marigold head and tried pressing the petals into soil. It never works, and the reason is straightforward plant biology. Petals are accessory floral parts. Their job is to attract pollinators, full stop. They contain no ovules, no embryo, and no dormant genetic material capable of germinating. Planting a marigold petal is like planting a leaf from your salad: it will decompose, but it won't grow. If you're specifically interested in working from petals, the related guide on how to grow marigold from petals goes deeper into this topic, but the short version is: stick with the seeds.
Can you grow marigolds from stem cuttings?
Technically yes, though it's not the standard route for most home gardeners. Stem cuttings work most reliably on signet marigolds (Tagetes tenuifolia) and Mexican tarragon (Tagetes lucida). African and French varieties root less predictably from cuttings, which is why seed is the near-universal recommendation for home production. That said, if you've got a special plant you want to clone, cuttings are worth trying.
Here's how to do it properly: take a 2 to 4 inch softwood cutting from non-flowering growth, strip the lower leaves, dip the cut end in an auxin-based rooting hormone powder or liquid, and push it into a moist, sterile soilless mix. Cover loosely with a clear plastic bag or dome to hold humidity, and place the cutting somewhere bright but out of direct sun. Roots typically form in two to three weeks when conditions are right. Once you see new leaf growth, you can treat it like a normal transplant. For a fuller walkthrough, the guide on how to grow marigold from stem covers the process step by step. Expect a higher failure rate than seeds, and don't be discouraged if your first few cuttings don't take.
Harvesting seeds from dried marigold flower heads
This is the most satisfying part of the whole process. Saving your own marigold seeds costs nothing and gives you a supply that will last three to five years if stored well. Here's exactly how I do it. For step-by-step instructions on growing marigolds from dried flowers, see the guide how to grow marigolds from dried flowers.
- Choose a flower head to save. Pick a healthy, fully open bloom from a vigorous plant. Don't deadhead it — let it stay on the plant to mature.
- Wait for it to dry fully on the plant. The petals will shrivel and fade, and the base (receptacle) will turn brown and feel papery or slightly crunchy. This usually takes two to four weeks after the bloom peaks.
- Snip or pinch off the dried head. If rain or heavy dew is forecast, you can cut the head early and finish drying it indoors on a paper plate or paper towel for another week.
- Hold the dried head over a clean bowl or paper towel. Gently pull apart the base with your fingers. The seeds will come free easily — they're the slim, dark, slightly curved slivers clustered at the bottom.
- Separate the chaff. Rub the cluster gently between your palms and blow lightly across the bowl. The lighter papery material will blow away; the heavier seeds stay.
- Spread seeds on paper to cure. Lay them in a single layer in a dry, ventilated spot out of direct sun for three to five days. This final drying step is important — any residual moisture speeds up decay in storage.
- Label and store. Once fully dry, transfer to a paper envelope or small airtight jar, label with the variety name and the date, and store somewhere cool and dry.
How to tell if your marigold seeds are mature and worth saving
Not every seed from a dried head is viable, so it helps to know what a good one looks like. Mature marigold seeds are dark brown to black, firm, and slightly curved or arrow-shaped. They should feel solid, not hollow or papery, when you pinch them lightly between two fingers. Pale tan or greenish seeds pulled from a flower head that wasn't fully dry are immature and unlikely to germinate well. If most of your seeds from one head look pale, let the next batch dry on the plant for another week before harvesting.
- Colour: dark brown to black (good) vs. pale tan or greenish (too immature)
- Feel: firm and slightly stiff (good) vs. soft, hollow, or bendable (poor viability)
- Shape: slender, crescent-shaped with a narrow tip (good) vs. crushed or deformed (damaged)
- Smell: neutral or faintly earthy (good) vs. musty or mouldy (discard)
Storing and preserving your marigold seeds
Proper storage is what separates seeds that germinate reliably next spring from ones that give you 10% germination and a lot of head-scratching. The two enemies of seed viability are heat and moisture. Marigold seeds stored in a cool, dry place (ideally below 50°F / 10°C and below 50% relative humidity) stay viable for three to five years, though germination rates will gradually decline after the first two seasons. I keep mine in labelled paper coin envelopes inside a zip-seal bag with a small silica gel desiccant packet, stored in the back of the fridge. If refrigerator space is tight, a cool basement shelf works for one to two seasons.
Always use paper envelopes rather than plastic bags as your primary seed container. Paper allows any tiny remaining moisture to escape; plastic traps it. If you're using a glass jar, make sure the seeds are genuinely bone dry before sealing, and include a desiccant packet. Write the variety, the harvest date, and the year on the label. It sounds obvious, but after two winters you'll be very glad you did.
When to start your seeds: timing by frost date
Marigolds are frost-sensitive annuals, so timing your sow around your last expected spring frost is the single most important scheduling decision you'll make. The two main approaches are starting seeds indoors four to six weeks before the last frost date, or direct sowing outdoors once frost danger has passed and soil has warmed. Both work well; the choice depends on your climate and how early you want blooms.
Indoor start vs. direct sow: pros and cons
| Method | When to start | Key advantage | Key drawback | Best for |
|---|---|---|---|---|
| Indoor start | 4–6 weeks before last frost | Earlier blooms; plants are established when transplanted | Requires trays, grow lights or sunny window, and hardening-off time | Gardeners who want blooms by early summer or live in short-season climates |
| Direct sow outdoors | After last frost, soil at least 60°F / 15°C | No transplant shock; simpler setup; often faster to settle in | Later blooms; seedlings compete with weeds early on | Warmer climates or gardeners sowing African types with long seasons |
| Direct sow in succession | Every 3–4 weeks from last frost through midsummer | Continuous fresh blooms into autumn | Requires planning and consistent follow-through | Cutting gardens and long-season displays |
For most home gardeners in temperate climates, starting indoors four to six weeks before your last frost gives you a head start worth having, especially with African marigolds (Tagetes erecta), which are slower to flower from seed and benefit from the extra weeks. French and signet types are faster and do beautifully from a direct sow once the soil warms. If you're unsure of your last frost date, your local cooperative extension office or a quick search for your zip code on a frost-date calculator will give you a reliable figure.
How to sow marigold seeds: step-by-step
Whether you're starting in trays indoors or sowing straight into a prepared bed, the fundamentals are the same. Marigolds are genuinely beginner-friendly here: they're not fussy about perfect sowing conditions the way some flowers are.
- Prepare your medium. For indoor starts, use a fresh sterile seed-starting mix — not garden soil, which can harbour pathogens. For outdoor direct sow, loosen the soil to about 4 inches deep, remove debris, and rake smooth. Marigolds prefer well-drained soil with a pH of 6.0 to 7.5.
- Sow at the right depth. Press seeds in about 1/4 inch (6 mm) deep, or simply lay them on the surface and cover with a thin layer of vermiculite. Deeper than 1/4 inch and germination slows noticeably.
- Water gently. Use a misting bottle or a watering can with a fine rose head. You want the medium evenly moist but not waterlogged. Soggy seeds rot.
- Provide warmth. Marigolds germinate best at 70–75°F (21–24°C). A heat mat under your seed tray speeds things up significantly if your home is cool. You should see radicle emergence in 3–7 days under ideal temperatures, with visible seedlings by day 5–10.
- Give them light right away. As soon as seedlings emerge, move them under grow lights or onto your sunniest south-facing windowsill. Insufficient light at this stage causes leggy, weak seedlings that struggle to recover.
- Thin to proper spacing. Once seedlings have their first true leaves, thin to one plant per cell (indoors) or to 6–12 inches for French and signet types, 12–24 inches for African types (outdoors). Crowded plants compete for resources and are more prone to fungal issues.
- Harden off indoor starts. One to two weeks before transplanting, begin setting trays outside in a sheltered spot for a few hours a day, gradually increasing exposure. This acclimatises them to outdoor conditions and reduces transplant shock.
Variety-specific notes: French, African, and signet marigolds
| Type | Species | Plant height | Spacing | Days to bloom from seed | Notes |
|---|---|---|---|---|---|
| French marigold | Tagetes patula | 6–18 inches | 6–12 inches | 45–55 days | Fast, compact, ideal for borders; great for direct sow; easy seed saving |
| African marigold | Tagetes erecta | 18–36 inches | 12–24 inches | 55–75 days | Larger blooms; slower to flower; indoor start strongly recommended in short seasons |
| Signet marigold | Tagetes tenuifolia | 8–12 inches | 6–9 inches | 50–60 days | Feathery foliage, small edible flowers; most amenable to stem cuttings; excellent container plant |
Routine care once seedlings are growing
Watering
Water at the soil line rather than overhead to reduce fungal disease risk. Let the top inch of soil dry out slightly between thorough waterings. Established marigolds are reasonably drought-tolerant, but consistent moisture during the seedling stage and at transplanting is non-negotiable.
Feeding
Avoid high-nitrogen fertilisers (the first number on the label). Too much nitrogen pushes leafy growth at the expense of flowers. A balanced fertiliser or one with slightly higher phosphorus (middle number) applied at planting time and once at midsummer is plenty for most garden soils. Overfeeding is a common beginner mistake with marigolds.
Deadheading and seed saving: the tradeoff
Here's a practical tension worth understanding: deadheading spent blooms (snipping off faded flowers just above the next leaf or node) keeps the plant producing new flowers continuously through the season. But if you deadhead every bloom, you'll have nothing to harvest seeds from at the end. My approach is to deadhead most blooms throughout the season to keep the display going, then flag three or four healthy heads in late summer to leave on the plant and dry for seed collection. This gives you both a long flowering season and a good seed supply for next year.
Troubleshooting common germination and growth problems
- Seeds not germinating after 10+ days: most likely the soil temperature is too low. Check with a thermometer — below 65°F significantly slows or stops germination. Move trays to a warmer spot or use a heat mat.
- Leggy, stretched seedlings: not enough light. Move to a brighter location or lower your grow lights to 2–4 inches above the seedling tops.
- Seedlings collapsing at soil level (damping off): a fungal problem caused by overwatering or poor air circulation. Water less, remove any standing water from trays, and use a fan to keep air moving. There's no cure once it hits — prevention is everything.
- Poor germination from saved seeds: seeds may have been stored in humid or warm conditions, or were harvested before fully mature. Test a small batch by placing 10 seeds on a damp paper towel in a warm spot for a week — count how many germinate to get your viability percentage.
- Stunted growth outdoors: often a soil temperature or compaction issue. Marigolds want warm, loose soil. If plants stall after transplanting, check that nighttime temperatures aren't still dipping toward freezing.
- Few flowers, lots of leaves: too much nitrogen in the soil or fertiliser. Ease off feeding and ensure the plants are getting at least six hours of direct sun per day.
Finding video demonstrations
If you're a visual learner, watching someone harvest, clean, and sow marigold seeds in real time can make the whole process click. There's a companion guide on how to grow marigolds from seed on YouTube that points you toward the most useful video formats and what to look for in a good demonstration. For seed harvesting specifically, search for videos showing the actual pulling apart of a dried marigold head, seeing the achenes fall free from the receptacle is genuinely helpful the first time you do it.
Your timeline from flower to new plant
Here's a practical end-to-end timeline so you can plan the full cycle in a single season.
| Stage | Timing | What's happening |
|---|---|---|
| Plant matures and blooms | Early to midsummer | Choose heads for seed saving; start deadheading the rest |
| Seed heads left to dry on plant | 2–4 weeks after bloom peaks | Petals shrivel; receptacle base turns brown and papery |
| Harvest and cure seeds | Late summer to early autumn | Extract achenes, spread on paper, dry for 3–5 days |
| Clean and store seeds | Before first frost | Label envelopes, add desiccant, refrigerate or cool-store |
| Start seeds indoors (next year) | 4–6 weeks before last frost | Sow at 1/4 inch depth, 70–75°F, expect sprouts in 5–10 days |
| Transplant or direct sow outdoors | After last frost, soil warm | Harden off indoor starts first; space per variety |
| First blooms appear | 45–75 days after sowing | Earlier for French, longer for African types |
Marigolds reward the full cycle approach: grow, save, store, resow. Once you've done it once, it becomes second nature, and you'll never need to buy a packet of marigold seeds again. The flowers are forgiving, the seeds are easy to identify, and the turnaround from sowing to bloom is fast enough to keep even impatient gardeners satisfied. Start with one dried flower head this season and you'll have more than enough seeds for yourself and a few neighbours besides.
FAQ
Can you grow marigold from a flower?
Yes. Marigolds are normally grown from the seeds (achenes) that form at the base/receptacle of a dried flower head. Letting a bloom dry on the plant or cutting and drying it produces the small crescent‑shaped ‘seeds’ you can harvest and sow.
Can you grow marigold from petals?
No. Petals are non‑reproductive floral parts and do not contain an embryo. A detached petal cannot grow into a new plant — you need the seed (the achene) produced in the flower’s center/base.
Can you propagate marigolds from stem cuttings?
Sometimes. Some Tagetes species (especially signet types and a few others) will root from softwood cuttings. Take 2–4 inch non‑flowering cuttings, remove lower leaves, optionally use auxin rooting hormone, place in sterile moist media, keep humid and bright; roots may form in ~2–3 weeks. However, commercial and home growers mainly use seed.
How do I harvest marigold seeds from a dried flower?
Wait until the bloom and its base/receptacle turn brown and dry. Either remove the dried head from the plant or cut and finish drying indoors. Pry or rub the small crescent achenes from the dried base, spread them to dry further on paper for a few days to cure, then clean off chaff before storing.
How should I store marigold seeds and how long do they last?
Dry the seeds thoroughly, place in paper envelopes or airtight jars with a desiccant, label with variety and date, and keep cool and dry (ideally ≤45–50°F / ≤10–12°C and low humidity). Properly stored seeds often remain viable 3–5 years; viability declines with heat and moisture.
When should I sow marigold seeds indoors or direct‑sow outside?
Indoor start: sow 4–6 weeks before your last expected spring frost. Direct sow: after the danger of frost has passed and soil has warmed. Marigold seeds germinate quickly in warm soil (about 70–75°F / 21–24°C).
Next Article
How to Grow Marigold From Stem Cutting: Step-by-Step
Learn how to grow marigold from stem cuttings, root in water or soil, avoid rot and mold, and transplant to flower.