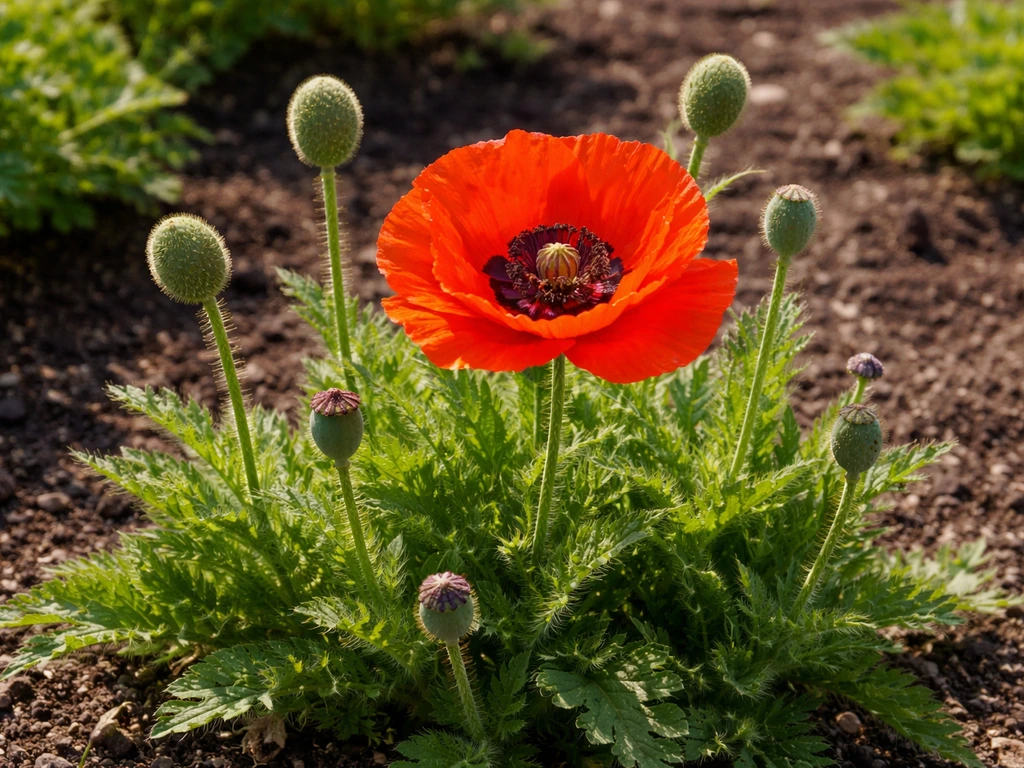
Welsh poppies (Papaver cambricum, also widely sold as Meconopsis cambrica) are one of the easiest perennial poppies you can grow, and once they settle into a shady corner they will return and self-sow for years. Scatter seed on the soil surface in autumn or early spring, keep it cool and moist, and you will have golden-yellow or soft orange bowl-shaped flowers nodding over ferny foliage the following season. They thrive in conditions most flowers dislike: part shade, cool damp summers, and acidic woodland-style soil. If you have a north- or east-facing border that confounds other plants, this is your flower.
How to Grow Welsh Poppies: Complete Seed-to-Bed Guide

Marcus Holloway
16 Jul 2026
Why Welsh poppies deserve a spot in your garden
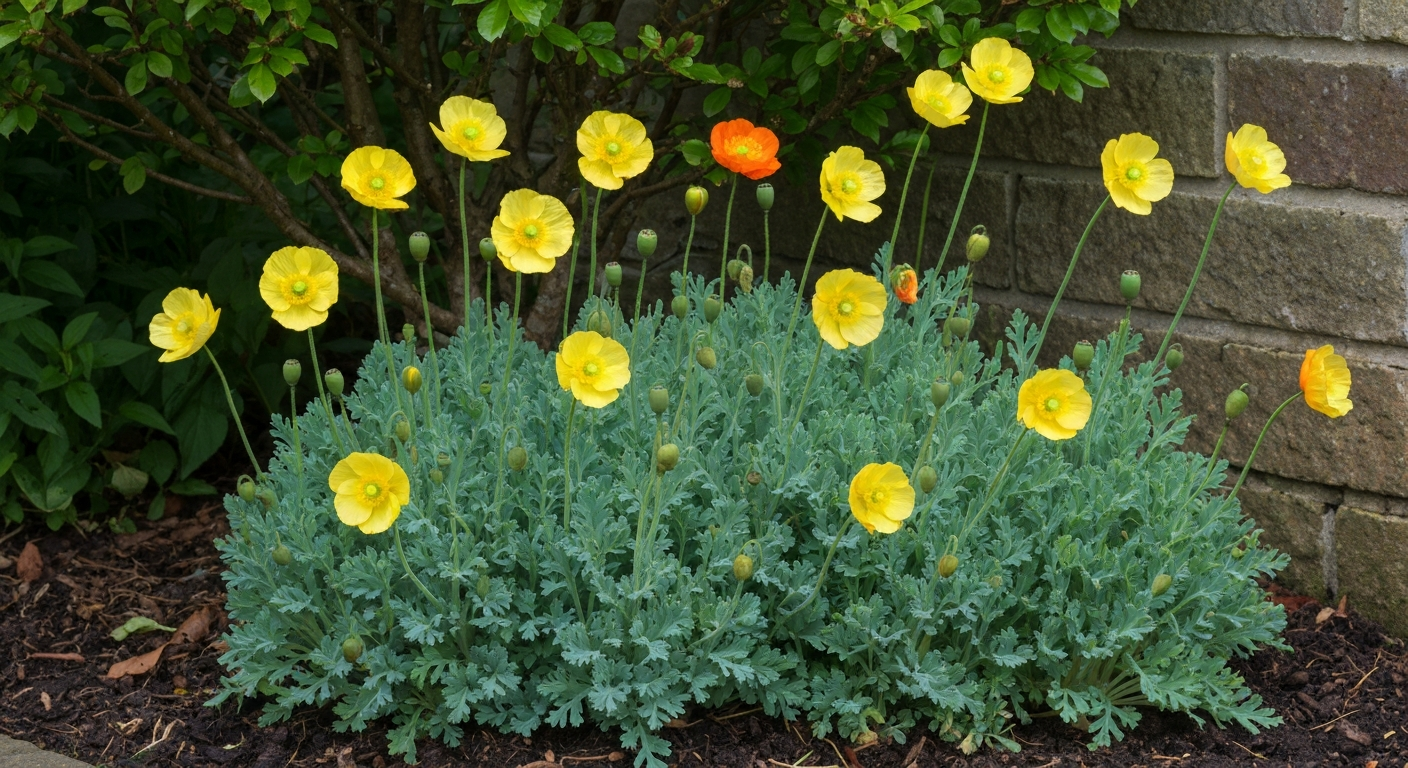
There is something quietly rewarding about a plant that does best when you leave it alone. Welsh poppies reward neglect better than almost any perennial in my garden. They fill awkward gaps under shrubs, soften shady path edges, and come back every year without fuss. The flowers are delicate and luminous, typically clear yellow but also available in warm orange and double forms, and they bloom from late spring well into summer. Because they seed themselves around freely, one packet of seed can eventually supply a whole bank of colour in places where little else will grow. They are genuinely beginner-friendly: germination is slow but not difficult, and the plants themselves are robust once established. The main thing to understand upfront is that they hate having their roots disturbed, which is why getting the sowing method right matters from day one.
A quick note on the name: you will see these sold as both Papaver cambricum and Meconopsis cambrica. Kew's Plants of the World Online now lists Papaver cambricum L. as the accepted scientific name, with Meconopsis cambrica as a synonym. Modern molecular work confirmed that Welsh poppies are genetically closer to Papaver than to the blue Himalayan poppies of the Meconopsis genus. For practical purposes the name on the seed packet does not change how you grow them, but it helps to know both names when searching for seed or plants.
What Welsh poppies need to grow
Before you sow a single seed, it is worth understanding what these plants genuinely want. Get these basics right and the rest is straightforward. For a broader overview of poppy requirements, see our guide on what do poppies need to grow.
| Condition | What Welsh poppies prefer | Notes |
|---|---|---|
| Light | Partial to light shade | Tolerates dappled sun; avoid hot afternoon sun |
| Soil | Moist, humus-rich, neutral to mildly acidic (pH 5.5–7.0) | Tolerates clay, loam, or sand if drainage is adequate |
| Moisture | Consistently moist but not waterlogged | Drought stress shortens flowering; mulch helps retain moisture |
| Temperature | Cool summers preferred | Performs best in climates without prolonged heat above 30°C/86°F |
| Aspect | North, east, or west-facing borders | A sheltered microclimate reduces heat stress in warmer zones |
| Fertiliser | Light compost or leaf mould at planting | Rich woodland-style soil; avoid heavy feeding which promotes foliage over flowers |
The RHS describes Welsh poppy as a tap-rooted perennial that performs best in moist, humus-rich, neutral to mildly acidic soil. Papaver cambricum cultural details (RHS), soil, moisture, pH: the RHS records Welsh poppy as a tap‑rooted perennial that prefers moist, humus‑rich, neutral to mildly acidic soil and advises amending heavy beds with compost and horticultural grit to improve structure and drainage Papaver cambricum cultural details (RHS) — soil, moisture, pH. That tap root is important: it anchors the plant and draws up moisture, but it also means transplanting is stressful. Amend heavy or compacted beds with compost and a handful of horticultural grit before sowing or planting to improve structure and drainage without drying the soil out.
Sowing timing by climate: Zone 5 and Zone 7 calendars
Welsh poppies need cool conditions to germinate well, so your climate zone determines everything about when you sow. The ideal germination temperature is around 10–18°C (50–64°F). Sow when the soil or indoor environment naturally falls in that range, and germination will be much more reliable. Sow into summer heat and you will likely wait a long time for nothing.
| USDA Zone | Autumn direct sow (outdoors) | Late winter indoor start | Spring direct sow (outdoors) | Transplant / thin out | Expected first flowers |
|---|---|---|---|---|---|
| Zone 5 (avg. min. −20°F/−29°C) | September to mid-October | Late February to mid-March indoors | As soon as soil is workable, March–April | After last frost, typically mid-May | Late spring to early summer, Year 1 or 2 |
| Zone 7 (avg. min. 0°F/−18°C) | October to early November | Late January to February indoors | Late February to March outdoors | After last frost, typically late March–April | Spring, often reliable in Year 1 |
In Zone 5, autumn sowing is my favourite approach because the seed gets a natural cold period over winter and germinates when the soil warms in spring, exactly mimicking what happens when a plant self-seeds. If you miss the autumn window, sow indoors in late February when indoor temperatures are still cool, or wait for the soil to be workable in early spring and direct sow then. In Zone 7, you have a longer mild autumn and earlier spring, so both autumn and early spring direct sowing work well. For more detailed timing and heat-management tips specific to warmer regions, see how to grow poppies in Zone 7. The milder winters in Zone 7 mean cold stratification happens naturally without risk of seed freezing solid. If you are gardening in Zone 5 specifically, there is more detailed timing guidance available for cool-season poppies in general, and the same principles apply here. The challenge in Zone 7 is summer heat: plant in the shadiest spot you have, mulch heavily, and expect flowering to taper off earlier in the season than it would in a cooler climate.
Direct sow or indoor start? Choosing your method
Welsh poppies can be grown both ways, and each method has a genuine use case. My honest recommendation: direct sowing is almost always better for this particular plant. The tap root establishes undisturbed, germination rates tend to be higher because you are sowing into a naturally cool seedbed, and you skip the stressful transplanting step entirely. Indoor starting is useful when you have precious seed from a named variety, want more control over conditions, or have missed the ideal outdoor sowing window.
| Method | Pros | Cons | Best for |
|---|---|---|---|
| Direct sow (autumn) | Natural cold stratification, no transplant shock, seed self-selects good germination spots, minimal work | Seed can wash away, harder to protect from slugs in early spring | Most gardeners; established beds; large areas |
| Direct sow (early spring) | Simple, low cost, good germination in cool spring soil | Narrower window before heat arrives, especially in Zone 7 | Gardeners who missed autumn sowing |
| Indoor start (late winter) | More control, useful for expensive named varieties, earlier establishment | Root disturbance at transplanting time, requires careful pricking-out, more equipment needed | Named varieties; small seed quantities; gardeners who want head start |
Seed preparation: surface sowing, light needs, and cold stratification
Welsh poppy seeds are tiny, and burying them is the single most common reason they fail to germinate. They are photoblastic, meaning they need light to trigger germination. Press them onto the surface of the compost or soil and do not cover them with more than the thinnest dusting of fine vermiculite or grit, just enough to anchor them and retain moisture. Ferri Seeds notes that germination typically takes 6–8 weeks at 10–18°C, but some seedlots run longer, so patience is genuinely part of the process.
Fresh seed germinates most reliably. Viability can decline quickly in storage, especially for small seedlots, so sow as soon as possible after purchasing or harvesting. If you are buying seed in summer for autumn sowing, keep the packet cool and dry until you are ready.
Cold stratification is worth knowing about even if you do not always need it. Autumn direct sowing provides stratification naturally as the seed sits in cool moist soil over winter. For indoor starts, or if you are sowing spring seed that is being slow to germinate, you can cold-stratify for 2–4 weeks: mix the seed with barely damp vermiculite in a sealed plastic bag, place it in the refrigerator at around 2–5°C (35–40°F), then bring it out to sow. This mimics winter and can break dormancy in reluctant seedlots. Research on Papaver species confirms that prechilling and light exposure both improve germination rates, so combining surface sowing with a cold period before germination temperatures arrive is the most reliable approach.
Step-by-step sowing instructions
Direct sowing outdoors
- Choose your site in late summer or early autumn (Zone 5: September–October; Zone 7: October–November). Clear weeds and rake the surface to a fine tilth.
- Work in a 5cm (2-inch) layer of well-rotted compost and a handful of grit per square metre if the soil is heavy. Rake level.
- Broadcast seed thinly across the surface. Mix seed with dry silver sand first if you struggle to see where you have sown; the sand helps you distribute the tiny seed more evenly.
- Gently press the seed into the soil surface using a flat board or the back of a trowel. Do not rake over the seed.
- Water in lightly using a fine rose watering can. The goal is to settle the seed without washing it into clumps.
- Mark the area clearly so you do not accidentally disturb it over winter.
- In spring, once seedlings emerge, thin to approximately 20–30cm (8–12 inches) apart, choosing the strongest plants and removing others with scissors rather than pulling, to avoid disturbing neighbouring roots.
- Keep the seedbed moist during dry spells in the first growing season.
Indoor start (late winter)
- Fill small pots or a seed tray with moist, peat-free seed compost mixed with 20% fine perlite or vermiculite. Firm lightly and level the surface.
- If cold-stratifying first, mix seed with damp vermiculite in a bag and refrigerate for 2–4 weeks before sowing. Otherwise sow directly from the packet.
- Scatter seed thinly on the compost surface. Aim for no more than one or two seeds per 5cm (2 inches).
- Do not cover the seed, or dust only the very lightest veil of fine vermiculite over the top. Light must still reach the seeds.
- Cover the pot with a clear propagator lid or a sheet of cling film and place somewhere cool: an unheated spare room, a cold greenhouse, or a north-facing windowsill at around 10–15°C (50–59°F). Avoid warm windowsills or airing cupboards.
- Check moisture every few days and mist gently if the surface is drying out. Do not let the compost become soggy.
- Germination can take anywhere from 3 weeks to 8 weeks or more. Do not give up if nothing happens in the first month.
- Once seedlings have two true leaves (distinct from the seed leaves), prick them out individually into 7–9cm (3-inch) pots using a dibber or pencil. Handle seedlings by a leaf, never the stem or root.
- Grow on in a cool, bright place and harden off over 10–14 days before planting out after the last frost date.
Photo suggestion: a close-up of tiny Welsh poppy seeds pressed onto the surface of moist compost in a small terracotta pot, with a fine mist of vermiculite barely visible over them. This image anchors the surface-sowing technique and makes it instantly clear why the seeds should not be buried.
Seedling care and transplanting
Welsh poppy seedlings are small and slow at first, which catches beginners off guard. The plant is putting energy into its tap root before it bothers with leaf growth, so what looks like nothing happening above ground is actually good establishment work below it. Keep the seedbed or pot consistently moist but not wet. Water from below (by sitting pots in a tray) rather than overhead if possible, since damp stems invite damping-off fungus.
The root disturbance issue is real and worth taking seriously. Welsh poppies have a tap root that resents being broken or kinked. When pricking out indoor seedlings, use a narrow dibber to ease the root out in one piece and drop the seedling straight into a pre-made hole in the new pot. When transplanting outdoor-raised seedlings or pot-grown plants to their final spot, water thoroughly an hour before moving, dig a generous hole, and tip the root ball out intact rather than pulling the plant. Firm back in gently and water immediately. Plants moved carelessly will sulk for weeks or not recover at all.
Hardening off matters especially in Zone 5, where the difference between indoor and outdoor conditions can be dramatic in early spring. Move pots outside to a sheltered spot for a couple of hours on mild days, gradually increasing exposure over 10–14 days before leaving them out overnight. Do not rush this step. A plant hardened off properly will establish in days; one thrown out cold will stall for weeks.
Photo suggestion: a seedling tray showing Welsh poppy seedlings at the two-true-leaf stage, with a pencil dibber lifting one seedling intact to show the delicate pale tap root. This photograph reinforces why careful handling is essential.
Choosing the right spot and preparing the soil
The ideal location for Welsh poppies is somewhere cool, lightly shaded, and reasonably moist. Think woodland edge, the shaded side of a fence, under deciduous shrubs, or along a north- or east-facing border. The RHS specifically recommends north, east, or west aspects, and gardeners in warmer parts of Zone 7 should prioritise spots that get afternoon shade. A microclimate sheltered from dry winds helps too, since wind desiccates the soil faster than the sun does.
Soil preparation is simple but important. Welsh poppies prefer moist, humus-rich, neutral to mildly acidic soil (pH 5.5–7.0). They will grow in clay, loam, or sandy soil as long as drainage is reasonable. For heavy clay, work in a bucket of garden compost and a generous handful of horticultural grit per square metre before sowing or planting. For very sandy soil, add extra compost to improve moisture retention. A light top-dressing of leaf mould in the planting area will keep conditions close to the woodland floor that these plants naturally colonise. Avoid very fertile, freshly manured beds, which push soft leafy growth at the expense of flowers.
Spacing depends on your goal. For a naturalistic colony, thin or plant to 20–25cm (8–10 inches) apart and let them self-sow to fill the gaps over time. For more formal arrangements, 30cm (12 inches) gives each plant room without crowding. Welsh poppies can also be grown in containers (a 25–30cm wide pot minimum per plant) using a mix of peat-free multipurpose compost and perlite, placed in a shaded position and watered regularly, though container-grown plants need more frequent moisture checks than those in open ground.
Photo suggestion: an established clump of Welsh poppies in flower at the base of a shaded garden wall or under a deciduous shrub, showing the naturalistic, self-seeding habit and the relationship between the ferny foliage and the luminous yellow-orange flowers.
Ongoing care: deadheading, mulching, and winter
Welsh poppies are low-maintenance once established, but a few care habits keep them performing well season after season.
- Deadheading: Remove spent flowers to extend the blooming period and reduce excessive self-seeding. If you want the plants to naturalise and spread, leave some seed heads to ripen and drop. Cutting back after the first flush of flowers sometimes encourages a second wave of blooms in cooler summers.
- Mulching: Apply a 5–7cm (2–3 inch) layer of leaf mould or composted bark around plants in spring and again in autumn. This retains moisture, keeps roots cool, and suppresses weeds without smothering the self-seeded seedlings you want to keep.
- Watering: Water regularly during dry spells, especially in the first season and in containers. Established clumps in cool shaded positions are fairly drought-tolerant but will drop their flowers early in a prolonged dry spell.
- Fertilising: A light top-dressing of garden compost or leaf mould in spring is enough. Avoid nitrogen-heavy feeds, which produce lush foliage but fewer flowers.
- Winter care: Welsh poppies are hardy perennials and need no special winter protection in Zone 7. In Zone 5, a layer of mulch over the crown after the first frosts helps protect the root from freeze-thaw damage. The top growth will die back; the tap root overwinters and produces new growth in spring.
Pests, diseases, and organic controls
Welsh poppies are reasonably trouble-free, but three problems come up often enough to be worth knowing.
| Problem | Signs | Organic control |
|---|---|---|
| Slugs and snails | Ragged holes in leaves and stems; young seedlings eaten to the ground overnight | Copper tape around containers; crushed eggshells or sharp grit around seedlings; evening patrol and hand-pick; nematode drench (Phasmarhabditis hermaphrodita) in spring |
| Damping-off fungus | Seedlings collapse at soil level with a pinched, water-soaked stem base; often spreads across a tray | Use clean pots and fresh compost; water from below; improve airflow around seedlings; do not overwater; sow thinly to avoid crowding |
| Aphids | Clusters of small soft insects on stems and buds; sticky honeydew residue; distorted new growth | Squash small colonies by hand; blast off with a jet of water; encourage ladybirds and lacewings; insecticidal soap spray as a last resort |
| Fungal leaf spot or grey mould (Botrytis) | Brown spots or grey fuzzy mould on leaves in humid conditions | Remove affected leaves; improve airflow; avoid overhead watering; do not crowd plants; clear plant debris in autumn |
Slugs are the biggest threat to seedlings, particularly in the cool, damp conditions Welsh poppies prefer. I always put a ring of sharp grit around newly emerged seedlings and do an evening patrol in the first few weeks after germination. Once plants are a few centimetres tall they are much less vulnerable.
Troubleshooting common problems
| Problem | Likely cause | Fix |
|---|---|---|
| Seeds not germinating after 8+ weeks | Seed buried too deep; soil too warm; old or non-viable seed; insufficient moisture | Resow on the surface at cooler temperatures; try cold stratification for 2–4 weeks first; use fresh seed next time |
| Leggy, pale seedlings | Too warm; not enough light; overcrowding | Move to a cooler, brighter position (not direct hot sun); thin seedlings; ensure good airflow |
| Short flowering season | Heat stress; soil drying out; plants in full sun | Move plants or add more shade; increase watering in dry periods; mulch heavily around roots |
| Plants die after first year | Not truly perennial in very hot or very dry conditions; root rot from poor drainage | Improve drainage before planting; choose shadier, cooler site; rely on self-seeding to replace plants naturally |
| No self-seeding despite healthy plants | Deadheaded too early; soil disturbed around base | Leave a few seed heads to mature and drop; avoid hoeing or disturbing soil around plants in late summer |
Saving seed from Welsh poppies
Welsh poppies produce cylindrical seed pods that are easy to recognise once you know what to look for. Each pod develops from the base of a spent flower and turns pale and papery as it ripens. Wait until the pod feels dry and you can hear the seed rattle inside before harvesting, typically 4–6 weeks after the flower drops. Cut the stem just below the pod and tip the seed into a small paper envelope or bag. Label it immediately with the variety name, colour, and harvest date.
Because Welsh poppy seed viability can decline relatively quickly, I store saved seed in a cool, dry, dark place (a tin in the refrigerator works well) and aim to sow it the following autumn rather than keeping it for years. Fresh seed always gives me better results than old. If you are growing more than one colour variant, isolate plants or accept that cross-pollination will produce seedlings of mixed colours, which is not necessarily a bad thing.
Photo suggestion: a close-up of a ripe Welsh poppy seed pod on the stem, showing the pale cylindrical capsule with the small holes at the top from which seed is released, next to a small open paper envelope of saved seed on a wooden surface.
Varieties worth growing
The straight species (Papaver cambricum) produces clear lemon-yellow flowers and is the form most likely to self-sow reliably. Beyond that, a few named selections and colour forms are worth seeking out.
- Papaver cambricum (species): Classic clear yellow, single bowl-shaped flowers. The most vigorous self-seeder. Easy to find as seed.
- Orange form: A warm tangerine-orange variant that sometimes appears in seedling populations. Some suppliers sell seed labelled specifically as the orange form. Slightly less common than yellow but equally easy to grow.
- 'Frances Perry': A rich red-orange selection named after the gardener Frances Perry. Available from specialist seed suppliers. Grows in the same way as the species but the colour is more vivid and striking.
- Double forms: Fully double flowers in yellow or orange. These are showier but tend to self-sow less freely than single forms; save seed from the best plants each year to maintain the strain.
- Mixed colours: Seed packets sold as mixed Welsh poppy will often give you yellows, oranges, and occasionally reds in the same drift, which looks lovely in a naturalistic planting.
Good companion plants
Welsh poppies associate beautifully with other shade-tolerant plants that share their preference for cool, moist conditions. Good companions include ferns (especially hart's tongue and male fern), hostas, astrantia, hardy geraniums like Geranium phaeum, and foxgloves. The bright yellow or orange flowers contrast particularly well against dark foliage. In a woodland-style border, let Welsh poppies seed among bluebells and Solomon's seal for a natural spring tapestry. Avoid pairing them with drought-lovers or sun-hungry plants that would require a growing environment incompatible with the poppy's needs.
Quick-care checklist
- Surface sow only, never bury the tiny seeds
- Sow in cool conditions: 10–18°C (50–64°F) for best germination
- Autumn sowing outdoors gives natural cold stratification and is the most reliable method
- Use fresh seed where possible; viability declines with storage
- Choose a part-shaded, cool, moist site with humus-rich, slightly acidic soil (pH 5.5–7.0)
- Amend heavy or sandy soil with compost and grit before sowing or planting
- Handle seedlings with minimal root disturbance; never yank out the tap root
- Harden off indoor-raised seedlings over 10–14 days before planting out
- Mulch around plants in spring and autumn to retain moisture and protect roots
- Leave some seed heads if you want plants to self-sow and naturalise
- Watch for slugs around young seedlings; use sharp grit and evening patrols
- Harvest seed pods when dry and papery; store in cool, dark conditions and sow the following autumn
FAQ
What authoritative taxonomy and naming note should the article include for Welsh poppies?
State that the accepted name in major databases is Papaver cambricum L. (syn. Meconopsis cambrica). Cite Kew POWO and IPNI and briefly explain the molecular phylogenetic work that returned this species to Papaver (so gardeners can search both names when sourcing seed/plant info).
What climate‑specific timing should I give for sowing in USDA zone 5 and zone 7?
Provide clear calendar windows: - USDA zone 5: Outdoor direct sow in autumn (late Sept–Oct) to overwinter and germinate in spring; or sow under cover in late winter (Feb–Mar) for planting out after final frosts (late Apr–May). - USDA zone 7: Outdoor direct sow in autumn (Oct–Nov) or very early spring (Feb–Mar); in warm summers prefer autumn sowing for stronger spring seedlings. Explain that cool, moist conditions speed germination and that surface‑sown seed prefers temperatures ~10–18°C (50–64°F).
Should gardeners start Welsh poppy from seed indoors or sow directly outside?
Offer three evidence‑based options with pros/cons and when to use them: 1) Direct sow outdoors (recommended for most home gardeners): scatter on surface in autumn to overwinter; minimal transplant shock, best for avoiding root disturbance. 2) Outdoor container sow (early autumn): sow in pots/flat and protect (cold frame) over winter — useful where soil is poor or slugs/pets are a problem. 3) Indoor/under‑cover sow (late winter/early spring): for controlled conditions when autumn sowing is missed — requires careful pricking‑out and delicate transplanting because plants dislike root disturbance. Include recommended use cases (zone, availability of protected space).
Do Welsh poppy seeds need cold stratification or light to germinate?
Explain seed physiology clearly: seeds are very small and commonly photoblastic (light‑requiring), so surface sowing is critical. Many seedlots show dormancy that cold‑moist stratification breaks; for reluctant batches: cold‑moist stratify 2–8 weeks (refrigerator, damp medium) or sow outdoors in autumn to get natural stratification. Note alternative lab methods (GA3, KNO3) exist in literature but are unnecessary for most gardeners.
What exact step‑by‑step sowing instructions should be included (surface sow technique)?
Give a concise step sequence: 1) Prepare a fine, firm, weed‑free seedbed or a flat/pot with fine seed compost mixed 20% grit for drainage. 2) Moisten medium until evenly damp. 3) Scatter seed thinly on the surface — do not bury. 4) Lightly press seed into the surface with a board; optionally dust with a thin layer of fine grit/vermiculite (not more than 1–2 mm). 5) Cover with a clear propagator lid or fleece in late sowings to retain moisture but allow light. 6) Keep at 10–18°C and evenly moist; expect germination after 2–8+ weeks. 7) Harden off seedlings and plant into final positions (or leave where sown).
How should seedlings be cared for and transplanted without damaging roots?
Provide targeted steps and tips: - Thin or prick out only when seedlings have 2 true leaves. - Use a dibber or sharp knife to lift seedlings with a soil clump to avoid disturbing roots. - Transplant into lightly prepared final soil or pots, keeping root ball intact. - Plant at the same depth as grown; firm gently and water in. - If container‑raised, minimize time in containers; move to final site as soon as true leaves appear. Emphasize that Welsh poppies are tap‑rooted and dislike root disturbance, so direct sowing is the least risky method.
Next Article
How to Grow Poppies in Zone 7: Seed to Bloom Guide
Step-by-step how to grow poppies in zone 7, with timing, sowing methods, troubleshooting, and seed pod tips.