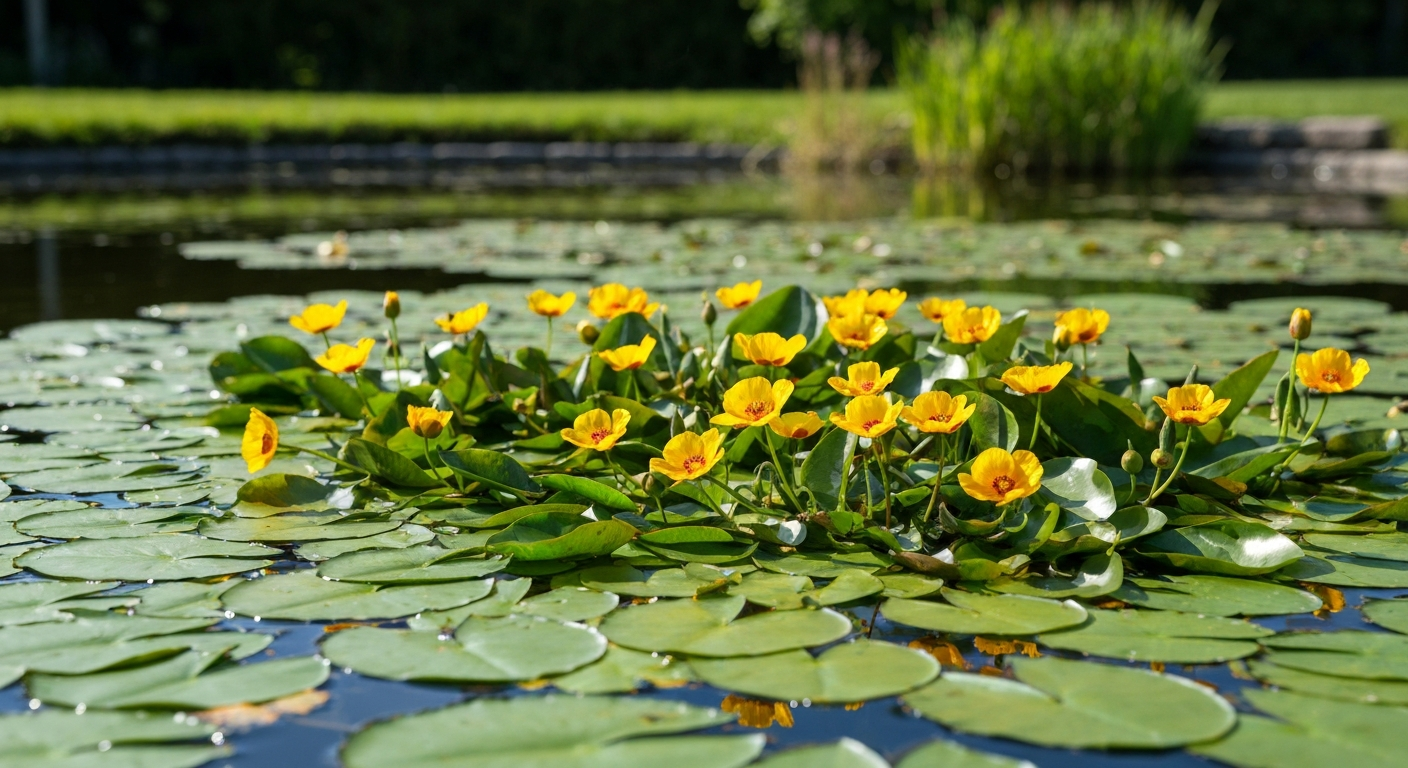
Water poppy (Hydrocleys nymphoides) is a floating aquatic plant that produces cheerful three-petaled yellow flowers with a reddish-brown centre throughout the warm season. It grows best in still or slow-moving water 6–10 inches (15–25 cm) deep, needs at least six hours of direct sun daily, and starts blooming once water temperatures hit around 70°F (21°C). You can grow it in a backyard pond or a large container on a sunny patio, and the easiest way to get started is with a rooted division or bare-root plantlet rather than seed. If you are in USDA zones 9–11, it can stay outside year-round; anywhere colder, bring it in for winter.
How to Grow Water Poppy: Complete Guide for Ponds & Pots
Marcus Holloway
19 Jul 2026
What water poppy actually is (and whether it suits your garden)
Hydrocleys nymphoides is a perennial aquatic herb in the Alismataceae (water-plantain) family, native to tropical and subtropical South America. Plants of the World Online (Kew Science) lists Hydrocleys nymphoides in the family Alismataceae (water‑plantain family): Hydrocleys nymphoides | Plants of the World Online | Kew Science. In the trade it goes by water poppy, Brazilian water poppy, or water buttercup. The plant spreads by stolons, long trailing runners that root at the nodes, forming a floating mat of glossy, oval to heart-shaped leaves 2–4 inches (5–10 cm) wide. Flowers are solitary, held just above the water surface, roughly 2–3 inches (5–7.5 cm) across, and individually short-lived (each bloom often lasts just one day), but plants produce them in steady succession throughout summer.
Before you buy, run through this quick checklist. Water poppy suits your garden if you can say yes to all three points.
- Space: you have a pond, half-barrel, or container of at least 3 gallons with a surface area of roughly 12 inches or more — the plant spreads and needs room to run its stolons.
- Sun: your chosen spot gets a minimum of 6 hours of direct sunlight per day through the growing season.
- Safety: your water feature is a closed, artificial system with no connection to natural wetlands, streams, or drainage. Hydrocleys nymphoides is documented as invasive or naturalized in Florida, Texas, New Zealand, parts of Australia, South Africa, and other warm regions. Never plant it where it can escape into the wild.
If your pond does overflow or drain into natural water, this is not the right plant for your site. The USDA APHIS weed-risk assessment confirms it can grow to depths of roughly 2 metres in permissive climates and spreads aggressively in warm, well-lit water. The U.S. Fish & Wildlife Service ecological risk screening summary (ERSS) and USDA APHIS weed‑risk documents note rapid growth in warm, well‑lit water and the capacity to grow to depths of roughly 2 m, supporting recommendations to restrict plantings to closed or artificial ponds. Check your local regulations before purchasing.
How water poppy differs from terrestrial poppies
Despite sharing a common name, water poppy has almost nothing in common with the papery-flowered poppies most gardeners grow in beds and borders. It is not in the Papaveraceae family at all. The name comes from the flower's passing resemblance to a poppy bloom, but the plant, the growing conditions, and the care routines are completely different. Here is a side-by-side look. For information on growing terrestrial Shirley poppies (Papaver rhoeas), see our guide on how to grow Shirley poppies.
| Feature | Water Poppy (Hydrocleys nymphoides) | Terrestrial Poppies (Shirley, celandine, peony/grey/black types) |
|---|---|---|
| Plant family | Alismataceae | Papaveraceae (or Ranunculaceae for celandine) |
| Growing medium | Water, 6–10 in (15–25 cm) deep | Well-drained garden soil |
| Growth habit | Floating/emergent aquatic, spreading by stolons | Upright annual or perennial, clump or self-seeding |
| Flower colour | Yellow with reddish-brown centre | Red, pink, white, purple, near-black depending on type |
| Flower petals | 3 | 4–many (often doubled in peony types) |
| Individual flower lifespan | ~1 day | Several days |
| Propagation | Division of rooted plantlets; seed (less common) | Seed sown direct; some by division |
| USDA hardiness | Zones 9–11 outdoors | Varies: Shirley annual; celandine zones 4–8; grey/black poppies annual to short-lived perennial |
| Invasive risk | Yes — do not plant near natural water | Generally low in most regions |
If you arrived here looking for Shirley poppies, celandine poppy, or the dramatic near-black peony-flowered and grey poppy types, those are all grown very differently, sown direct into borders, not submerged in water. For specific guidance on cultivating the near‑black peony‑flowered poppy, see black peony poppy how to grow. For a focused guide on growing the striking grey poppy, see How to grow amazing grey poppy. They each deserve their own focused guide, and all are well suited to cutting gardens and informal beds. Water poppy is purely for water features.
Choosing varieties and sourcing healthy plants
Authoritative sources including Missouri Botanical Garden and NC State Extension list Hydrocleys nymphoides as the species typically sold in the trade, with no widely adopted stable named cultivars registered. What you will find in nurseries and online pond-plant suppliers are species-level clones or varietal selections, sometimes labelled simply as 'Water Poppy.' That means you cannot rely on cultivar consistency the way you might with, say, a named petunia, there will be some variation in leaf size and stolon vigour between suppliers.
When buying, look for these signs of a healthy plant.
- Firm, green leaves with no yellowing, browning, or mushy spots.
- Visible white or pale-yellow root growth at the base of the crown or along stolon nodes.
- No foul smell, which indicates rot in transit.
- A bare-root or potted plant with at least one rooted node — bare-root plantlets ship well and establish quickly when handled correctly.
- A supplier who ships in the active growing season (late spring to midsummer) for best establishment success.
Buy from reputable aquatic nurseries or pond-plant specialists rather than general-purpose garden centres, where aquatic plants are often mistreated or mislabelled. If you already have a pond-keeping friend with water poppy, simply ask for a rooted stolon cutting, that is the easiest and cheapest way to get started.
Timing and schedule: when to plant and when to expect flowers
Water poppy is driven by temperature more than calendar date. The key number is 70°F (21°C), that is the water temperature at which flowering reliably begins. In most temperate climates, that means planting out in late spring to early summer and expecting first flowers within a few weeks of establishment, continuing through summer until water temperatures drop in early autumn.
| Task | Temperate zones 6–8 (approximate) | Zones 9–11 (approximate) |
|---|---|---|
| Plant out divisions | Late May to early June | March to April (or year-round in warmest zones) |
| First flowers expected | June to July | April to May |
| Peak flowering | July to August | May to September |
| Decline/stop flowering | September | October to November |
| Bring indoors (if needed) | Before first frost, typically October | Not needed in zones 10–11 |
If you are starting from seed indoors, add 8–12 weeks onto those timings for germination and early seedling growth before you can transplant. Seed is rarely the recommended route (more on that in the sowing section), but if you want to try it, start seeds in late winter under cover so seedlings are ready to go out when water temperatures warm up.
Pond vs container: picking the right setup
Both setups work well for water poppy. The main differences are control, cost, and how much of the plant's spreading habit you want to manage. Here is what to consider for each.
Garden pond
A pond gives the plant maximum room to run and produces the most dramatic display. Place the planted container or bare-root crown on a shelf or the pond bottom so the soil is 6–10 inches (15–25 cm) below the surface. Make sure the pond is closed, no overflow pipe feeding a stream or natural water body. On warm sunny days in a good-sized pond, one plant can send stolons 3–4 feet in a single season, so be prepared to trim runners regularly.
Container or patio tub
A container is my preferred starting point for beginners because you have complete control over water depth, temperature, and fertiliser. Use a pot or half-barrel of at least 3 gallons (around 12 litres), larger is better. A wide, shallow vessel is more useful than a tall, narrow one because the plant wants horizontal spread, not vertical depth. Place it in the sunniest spot on your patio or deck. In cold climates, containers are also much easier to move indoors for winter.
- Minimum container size: 3 gallons (approx. 12 litres), ideally 5–10 gallons for one established plant.
- Avoid containers with drainage holes — you need to hold water.
- Dark-coloured containers absorb more heat and warm up faster, which helps early-season flowering.
- Place the container where it will get full sun for at least 6 hours; a south- or west-facing spot is ideal.
Water depth and temperature: the exact numbers
Getting depth right is probably the single most important practical decision you will make. Missouri Botanical Garden recommends setting the soil surface of the planted container so it sits roughly 6–10 inches (15–25 cm) below the water surface, with best results at around 6 inches (15 cm). The RHS similarly recommends up to 8 inches (20 cm) as the planting depth. Deeper is not better, the plant can technically grow in much deeper water, but flowering and leaf coverage suffer.
To measure this in a container, fill the vessel with water and use a ruler or a cane marked at 6 inches. Lower your planted pot until the soil sits at that level, then place a stone or brick underneath to hold it there if needed. In a pond, use a pond shelf or stacked bricks to achieve the right height.
| Parameter | Recommended range | Notes |
|---|---|---|
| Planting depth (soil to water surface) | 6–10 in (15–25 cm); best at 6 in (15 cm) | Shallower end promotes better flowering |
| Water temperature for flowering | 70°F (21°C) minimum | Growth slows significantly below 60°F (15°C) |
| Optimal growing water temperature | 70–85°F (21–29°C) | Thrives in warm, still water |
| Cold tolerance (water) | Avoid freezing — crowns damaged by ice | Move containers indoors before frost |
Check water temperature with a simple aquarium thermometer, they cost a few dollars and take the guesswork out of timing. If your container water is not yet reaching 70°F by early June, you can place a dark-coloured container in a south-facing spot, or start it indoors on a warm windowsill and move it outside once temperatures climb.
Substrate and planting medium
Water poppy is not fussy about soil, but it does need something dense enough to anchor the plant and hold nutrients. Avoid regular potting compost on its own, it floats, clouds the water, and breaks down too fast. Instead, use one of these options.
- Heavy clay loam or garden topsoil (clay-based): the traditional and most cost-effective option. Scoop it from a border that has not been treated with herbicides.
- Proprietary aquatic planting compost: formulated specifically for submerged containers; widely available at water garden centres.
- A 50/50 mix of heavy loam and aquatic compost: a good middle ground that offers structure and slow nutrient release.
Fill your planting container about two-thirds full with substrate. Set the crown or rooted plantlet in the centre, firm the substrate around the roots, then cap the surface with a 1-inch (2.5 cm) layer of pea gravel or coarse grit. This gravel cap is important, it stops the substrate from billowing out into the water when you lower the pot and keeps fish from disturbing the roots if you have a fish pond. The planted crown should sit at or just above the substrate surface; do not bury it deeply.
Sowing from seed: step by step
I will be honest with you: seed is the hard route with water poppy. Missouri Botanical Garden notes that seed is often difficult to harvest in garden and trade settings, which is why almost everyone propagates vegetatively. If you do have seed (or want to experiment), here is how to do it.
- Timing: start seeds indoors 8–12 weeks before your expected outdoor planting date (typically late winter to early spring in temperate climates).
- Containers: use a shallow seed tray or pan with no drainage holes, or plug the holes with silicone.
- Substrate: fill the tray with a thin layer (1–2 inches / 2.5–5 cm) of heavy loam or aquatic compost.
- Sowing: scatter seeds thinly on the surface. Do not bury them deep — sprinkle a very thin layer of fine sand or vermiculite (about 1–2 mm) over the top just to anchor them.
- Water: carefully fill the tray with still water to a depth of 1–2 inches (2.5–5 cm) above the substrate surface. Use room-temperature water.
- Temperature: keep the tray somewhere consistently warm — 70–75°F (21–24°C). A heat mat under the tray speeds things up significantly.
- Germination time: expect germination in 2–4 weeks at the right temperature. It can be erratic, so don't give up if a few weeks pass with no action.
- Seedling care: once seedlings have 2–3 small floating leaves, gradually increase water depth to 3–4 inches (7.5–10 cm). Keep them in bright, indirect light indoors until outdoor water temperatures are stable above 70°F.
- Transplant: move seedlings to their final pond container at the same depth and in the same way as divisions (described below).
Common seedling problems include damping off at the crown if the seedling sits in stagnant, poorly oxygenated water, refresh the water gently every week or two. Very slow or zero germination usually means seeds were old, stored dry, or the temperature was too low. Aquatic plant seeds often have short viability, so fresh seed gives the best results.
Planting divisions and bare-root plants: step by step
This is the approach I recommend to anyone starting out. Rooted divisions establish fast and you will typically see new leaf growth within a week or two of planting correctly.
- Prepare the container: fill a wide, shallow pot two-thirds full with heavy loam or aquatic compost.
- Inspect the plant: trim any dead, blackened, or mushy roots with clean scissors. Keep firm white or cream roots.
- Position the crown: sit the plant in the centre of the pot with the crown (the growing point where leaves emerge) at or just above soil level. Do not bury the crown.
- Firm the substrate: gently press the substrate around the roots so the plant cannot float free when submerged.
- Gravel cap: add a 1-inch (2.5 cm) layer of pea gravel over the entire soil surface, working it gently around the base of the crown.
- Submerge: lower the pot slowly into still water so the soil surface sits 6 inches (15 cm) below the water surface. Use bricks or pond shelving to achieve this height if necessary.
- First two weeks: keep the water still and warm. Avoid moving the container around while roots are establishing.
- Signs of establishment: new leaf pads floating on the surface within 1–2 weeks means the plant is settled and growing.
Light and placement
Full sun is non-negotiable for good flowering. Multiple authoritative sources including Missouri Botanical Garden and the RHS specify a minimum of 6 hours of direct sunlight per day. In practice, the more sun the better: plants in 8+ hours of direct sun flower more freely, spread more vigorously, and keep healthier leaf colour. Partial shade (3–4 hours) will keep the plant alive but shift its energy into vegetative growth, lots of leaves, fewer flowers.
Position containers away from overhanging trees, which create shade and drop debris into the water. In very hot climates (zones 10–11), a small amount of afternoon shade can prevent the water in a container from overheating above 90°F (32°C), which can stress the plant. If you notice scorched leaf edges combined with warm water, move the container slightly to catch shade after 2 pm.
Feeding and fertilising
Water poppy is not a heavy feeder, but it does benefit from a slow nutrient supply through the growing season. The key is feeding the root zone, not the open water, adding liquid fertiliser to the water is wasteful, encourages algae, and can harm fish.
- Product type: use aquatic plant fertiliser tablets or sachets specifically designed for submerged containers. These push nutrients directly into the substrate.
- Timing: apply one tablet per planting container at the start of the growing season (when you first submerge the pot), then again every 4–6 weeks through summer.
- Amount: follow the packet rate for your container size. More is not better — overfeeding raises phosphate and nitrate levels in the water, triggering algae blooms that shade out your plant.
- Stop feeding: cease in late August to early September in temperate climates, allowing the plant to slow down naturally before cooler temperatures arrive.
- No feeding needed in winter or during dormancy.
Water quality and routine maintenance
Still or very slow-moving water suits water poppy well. Unlike many pond plants, it does not need aeration, in fact, it often grows in calm, warm water in the wild. That said, stagnant water in a small container can become a problem: it clouds, smells, and breeds mosquitoes. Here is how to keep things healthy.
- pH: aim for a pH between 6.5 and 7.5. You can test this with inexpensive aquatic pH test strips. If pH drifts above 8, a partial water change usually corrects it.
- Water changes (containers): top up evaporation losses with dechlorinated tap water or collected rainwater every week in hot weather. Do a 20–30% water change every 3–4 weeks to prevent nutrient and waste build-up.
- Filtration: a small submersible pump or air stone is not strictly necessary for water poppy alone, but helps in containers with fish. Keep filter flow gentle — water poppy prefers calm conditions.
- Algae control: the best long-term defence against algae is keeping surface coverage high (your own floating leaves compete with algae for light), maintaining correct nutrient levels, and not overfeeding.
- Mosquito prevention: in still-water containers without fish, drop in a Bti mosquito dunk (Bacillus thuringiensis israelensis) every 30 days. This is a biological control safe for plants and amphibians.
Pruning, deadheading and routine grooming
Water poppy is low-maintenance but does benefit from regular tidying through the growing season.
- Spent flowers: individual flowers last only about a day, and they drop cleanly into the water. You do not need to deadhead as aggressively as you would a terrestrial flower — the plant produces blooms in steady succession regardless. Remove any flower stalks left floating on the surface to prevent them from decomposing and clouding the water.
- Yellow or dying leaves: remove these promptly at the base with scissors or snips. Old leaves decompose underwater and affect water quality.
- Stolon trimming: trim stolons that have grown beyond the edge of your pond or container edge every 2–3 weeks in summer. Cut them back to within the boundary of your feature and remove the trimmings completely — do not drop them into adjacent water or compost where they could spread.
- End-of-season cut-back: before overwintering, cut the plant back to the crown and remove all dead foliage from the water.
Propagation: seed, division and runners
Water poppy practically propagates itself once established, the stolon runners root at their tips and produce new plantlets continuously through summer. Here are all three options.
Division
This is the most reliable method. In spring (or whenever the plant is actively growing), lift the container from the water. Gently tease apart the crown into sections, each with roots attached. Repot each section into a fresh container with new substrate and return to the pond at the recommended depth. Best done when the plant is outgrowing its pot or every 2–3 years.
Stolon runners
The easiest propagation of all. Look for a stolon tip with a visible cluster of roots at the node. Snip the stolon about 2 inches (5 cm) back from the rooted node, pot the rooted section into a small container with loam and gravel cap, and submerge at the correct depth. NC State and Missouri Botanical Garden both recommend this as the go-to propagation method. It works from late spring through summer.
Seed
As covered in the sowing section above, seed works but is unreliable and slow. Treat it as an experiment rather than a primary propagation strategy. If you want to grow more plants efficiently, runners or division will get you there much faster.
Pests, diseases and common problems
Water poppy is remarkably trouble-free compared to most garden plants, but a few issues do crop up.
| Problem | Identification | Control |
|---|---|---|
| Aphids | Clusters of small soft insects on new growth and flower buds above the water surface | Knock off with a strong jet of water; introduce ladybirds or lacewings; avoid chemical sprays near water. |
| Leaf-mining insects | Pale wiggly trails inside leaves | Remove and dispose of affected leaves. Usually cosmetic only — rarely threatens plant health. |
| Crown rot | Mushy, foul-smelling crown; leaves collapsing | Remove plant, trim rotted material back to firm tissue, repot in fresh substrate, improve water circulation. |
| Algae (blanketweed or green water) | Dense green threads or cloudy green water blocking light | Increase floating leaf coverage, reduce feeding, do partial water changes. Barley straw extract can help in ponds. |
| Snail damage | Ragged holes in leaves | Remove snails by hand at night; avoid chemical molluscicides in closed water features with plants. |
Avoid using broad-spectrum insecticides or herbicides anywhere near the water feature, these can wipe out beneficial insects, amphibians, and the plant itself. Stick to mechanical removal and biological controls wherever possible.
Troubleshooting checklist
| Symptom | Likely cause | Fix |
|---|---|---|
| Yellowing leaves | Nutrient deficiency or waterlogged/rotting roots | Check crown for rot; apply aquatic fertiliser tablet if none used recently. |
| No flowers despite healthy growth | Insufficient sun or water temperature below 70°F (21°C) | Move to sunnier spot; wait for or warm up the water. |
| Plant keeps floating free | Crown not anchored properly; gravel cap missing | Lift pot, re-firm substrate, add gravel cap, resubmerge. |
| Leaves sinking rather than floating | Plant set too deep; or weak new growth with insufficient buoyancy | Raise container so soil sits at 6 in (15 cm) not deeper. |
| Rapid algae after planting | Overfeeding or too much bare water surface | Reduce fertiliser; allow plant to spread and cover more surface. |
| Leaves turning brown at edges | Water overheating (above 90°F/32°C) or sun scorch | Add partial afternoon shade; increase water volume in container. |
| Slow growth after planting | Cold water; wrong depth; poor light | Check all three: water temp, depth, and daily sun hours. |
| Water smells bad | Decomposing leaves or waste build-up | Remove all dead plant material; do a 30% water change. |
Getting the best flower display
Because each individual flower only lasts a day, a mass-flowering effect comes from having many flowering plants or a well-established large plant with numerous flower-bearing stolons. Here is how to push flowering to its peak.
- Maximise sun: even an extra hour of direct sun per day noticeably increases flower count over a season.
- Keep water warm: flowering switches on at 70°F (21°C) — warm containers warm up faster than ponds, so container-grown plants often start flowering earlier in spring.
- Feed consistently: apply aquatic fertiliser tablets every 4–6 weeks through summer. Skipping feeds in midsummer leads to a lull in flowering.
- Divide every 2–3 years: overcrowded rootstocks produce fewer flowers. A freshly divided and repotted plant typically flowers more freely in its first season after division.
- Remove old leaves promptly: they reduce light to emerging flower stems and decompose into the water.
Month-by-month seasonal care calendar (temperate climate, zones 6–8)
| Month | Key tasks |
|---|---|
| January–February | Plant is in indoor storage or dormant. Check overwintering plants are not drying out completely. Do not feed. |
| March | Begin checking water temperature indoors. If keeping a stored container, bring into a warm bright room to start growth. |
| April | Prepare planting containers and fresh aquatic substrate. Order bare-root plants or divisions if needed. |
| May | Once outdoor water temp reaches 60°F+ (15°C+), move containers outside to a sunny spot. Plant divisions. Add first aquatic fertiliser tablet. |
| June | Monitor water depth and temperature. Expect first flowers once water hits 70°F (21°C). Begin trimming stolons. |
| July | Peak growing season. Feed every 4–6 weeks. Trim stolons weekly. Remove dead leaves and spent flower stalks. |
| August | Continue trimming and light feeding (last feed of the season around mid-August). Propagate by stolon runners now if desired. |
| September | Reduce maintenance. Stop feeding. Begin monitoring overnight air temperatures. |
| October | Bring containers indoors before first frost. Cut back to crown. Remove dead foliage. Store in frost-free location. |
| November–December | Keep stored containers just moist — not submerged in cold water. Maintain frost-free conditions. |
Winter care and cold-climate strategies
Water poppy is cold-hardy only to about USDA zone 9 outdoors. In zones 6–8, the crown will be killed by frost if left in an outdoor pond. Here is how to keep it alive over winter.
Container-grown plants
This is the easiest situation. Before your first expected frost (usually October in most of zones 6–7), lift the container from the water, cut the plant back to the crown, remove all dead leaves, and move the container to a frost-free indoor location, a garage, greenhouse, or basement works well. Keep the substrate just moist but not submerged. The plant will go dormant and can be returned to the pond in spring once water temperatures warm again. An alternative is to submerge the container in a large indoor tub of water indoors near a sunny window, which keeps the plant growing slowly through winter.
Pond-grown plants
If the plant is growing in a container inside a pond, lift the container before the first frost, treat it the same as above, and return it in spring. If you have a very deep pond (over 3 feet / 90 cm) in a mild zone 8 climate, some growers leave the container on the deep pond shelf below the ice line, where temperatures may stay just above freezing. This is a gamble, success depends on winter severity and I would not risk it in zones 7 or colder. When in doubt, bring it in.
Long-term management: keeping a healthy plant and pond
Water poppy is a vigorous plant and will outgrow its container every 2–3 years. When you notice the following, it is time to repot or divide: roots circling thickly at the base of the pot, noticeably reduced flowering compared to previous seasons, or the plant lifting itself partially out of its container as the root mass expands.
Lift the container in spring, remove the root ball, divide into sections each with healthy roots and a crown growing point, and repot into fresh aquatic compost in cleaned containers. Discard old, woody root sections and start fresh. This annual or biennial repotting keeps the plant performing well and prevents it from becoming a tangled mass that is hard to manage.
In a pond with multiple aquatic plants, water poppy complements submerged oxygenators and deeper-water plants by providing surface coverage that reduces algae. Aim for 50–70% surface coverage across the whole pond for the healthiest ecosystem balance. If water poppy is taking up too much surface area, simply trim runners aggressively rather than reaching for chemicals.
Essential supplies and quick setup checklist
Here is everything you need to get started with water poppy from scratch. Nothing on this list is expensive or hard to find.
| Item | Specification / notes |
|---|---|
| Container or pond | Minimum 3-gallon wide shallow vessel (no drainage holes) for container growing; or use existing pond |
| Substrate | Heavy clay loam or proprietary aquatic planting compost |
| Gravel or pea grit | Pea gravel for 1-inch surface cap; keeps substrate in place |
| Aquatic fertiliser tablets | Slow-release tablets designed for submerged aquatic pots |
| Plant (division or bare root) | Rooted stolon or division from reputable aquatic nursery |
| Aquarium thermometer | For monitoring water temperature — critical for timing |
| pH test strips | For routine water quality checks (target pH 6.5–7.5) |
| Scissors or aquatic snips | For trimming stolons, removing dead leaves and spent flower stems |
| Bricks or pond shelf risers | To set container at the correct 6-inch (15 cm) depth |
| Mosquito dunk (if no fish) | Bti biological control for still-water containers |
That really is all of it. Water poppy is one of the more forgiving and rewarding aquatic plants for beginners: set it up at the right depth, put it in a sunny spot, keep the water reasonably clean and warm, and it will reward you with a procession of cheerful yellow flowers from early summer to early autumn. The stolon habit means your original plant can be divided into a dozen new ones within a couple of seasons, plenty to share, and a great excuse to upgrade to a bigger pond.
FAQ
What is the correct scientific name and common names for water poppy?
The accepted scientific name is Hydrocleys nymphoides (Alismataceae). Common horticultural names include water poppy or water‑poppy; it is also sold as Brazilian water buttercup in some trade listings.
Does water poppy suit my space and climate?
Water poppy is best for small, closed ornamental ponds, water containers or tubs in warm climates (USDA zones ~9–11 outdoors). It is a tender aquatic; in colder zones overwintering indoors or lifting to a frost‑free location is needed. Avoid planting in open natural waterways because it can naturalize/invade in warm regions.
Which site and light conditions produce the best flowering?
Plant in full sun (about 6+ hours of direct sun daily) for heavy flower set. Partial shade will reduce blooms and favor vegetative spread. Provide still or slow‑moving water — strong currents reduce establishment and flowering.
What exact water depth and temperature does Hydrocleys nymphoides prefer?
Plant so the crown/rooted plantlets sit in about 6 in (15 cm) of water ideally; acceptable margins range from roughly 2–8 in (5–20 cm) depending on container placement. Flowering generally begins when water temperatures reach ~70°F (≈21°C) and continues through the warm season.
What containers and substrate should I use for pond or patio tubs?
Use wide, shallow aquatic planting pots (1–5+ gallon equivalents depending on scale). Fill with heavy loam or commercial aquatic planting media; cap with coarse gravel to prevent washout. Place pot on the pond bottom, shelf or in a patio tub so the soil surface is ~6 in (15 cm) below the water surface.
How do I grow water poppy from seed (exact sowing instructions)?
Seeds are less commonly used but can be sown: sow seeds thinly in shallow pans filled with aquatic or fine loam, cover lightly with sand/vermiculite, then place pans under 1–2 in (2.5–5 cm) of still water. Maintain water and air temperatures around 70–75°F (21–24°C). Keep pans in bright light or full sun and move seedlings to pots or pond margin once they have true leaves and roots.
Next Article
How to Grow Marigold From Stem Cutting: Step-by-Step
Learn how to grow marigold from stem cuttings, root in water or soil, avoid rot and mold, and transplant to flower.