Pink poppies are some of the easiest and most rewarding flowers you can grow from seed, and the key to getting them right is surprisingly simple: scatter the seed on the surface, keep it moist, and let the season do the heavy lifting. Most pink poppy varieties are direct-sown annuals that go from seed to bloom in about 60–90 days, and once you understand a handful of non-negotiables (no deep burial, sharp drainage, the right sowing window), you will have armfuls of papery blooms without a lot of fuss.
How to Grow Pink Poppies: Seed-to-Bloom Guide for Beginners

Marcus Holloway
11 Aug 2026
What to expect when growing pink poppies
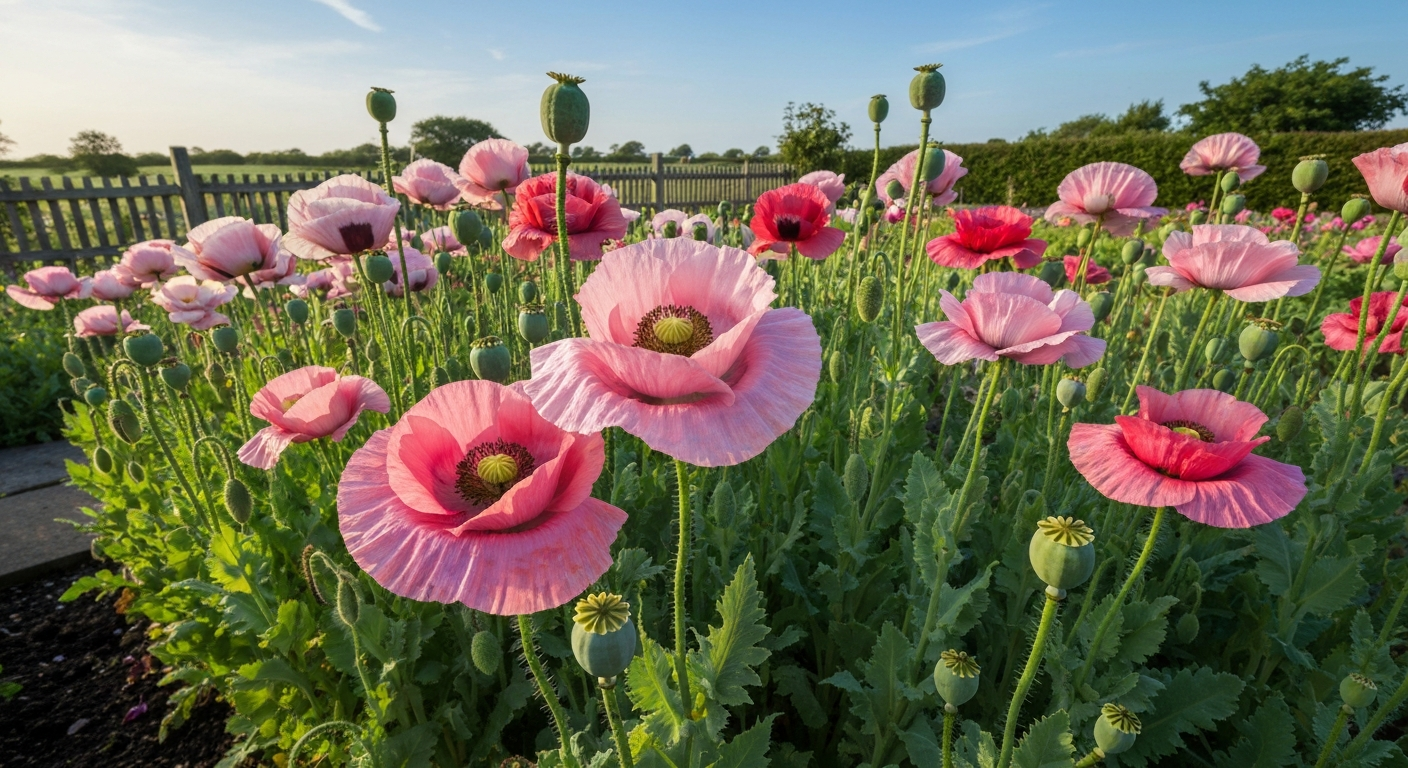
Growing pink poppies for the first time feels a little counterintuitive. The seeds are tiny, almost dust-like, and you are told to barely cover them. Germination can take anywhere from one to four weeks. Then, for a while, all you see is a flat rosette of ferny leaves. But when the buds finally appear and unfurl into those translucent, crepe-paper blooms, everything clicks. The whole cycle from sowing to harvest is achievable in a single growing season, which makes poppies incredibly satisfying for beginners. You do not need a greenhouse, special equipment, or years of experience. What you do need is good timing, a sunny spot with well-drained soil, and the patience to thin your seedlings properly.
This guide covers the full journey: choosing your variety, preparing your bed, sowing seeds correctly, spacing and thinning, watering and feeding, cutting for bouquets, saving seed, and dealing with anything that goes wrong. If you follow these steps, there is no reason you cannot have a reliable drift of pink poppies blooming in your garden this year.
Annual vs perennial: choosing the right pink poppy type
Before you buy seed, it helps to know that not all poppies behave the same way. Some are true annuals that live, flower, set seed, and die within a single season. Others are perennials that come back year after year. The right choice depends on your climate, your patience, and what you want from the plant.
| Species | Common Name | Life Cycle | Best for Pink Blooms | Notes |
|---|---|---|---|---|
| Papaver somniferum | Breadseed / Opium poppy | True annual | Yes — wide range of pinks | Self-seeds freely; peony and laciniatum forms especially showy |
| Papaver rhoeas | Corn poppy / Shirley poppy | True annual | Yes — Shirley series includes soft pinks | Very easy; shorter blooms; great for cutting |
| Papaver nudicaule | Iceland poppy | Short-lived perennial / biennial | Yes — salmon and soft pink tones | Best in cool climates; treat as annual in warm zones |
| Papaver orientale | Oriental poppy | Hardy herbaceous perennial | Limited — mostly reds/oranges; some pink cultivars | Returns each year; dies back in summer; needs space |
For most home gardeners growing pink poppies in a cutting garden or border, Papaver somniferum and Papaver rhoeas (Shirley types) are the best starting points. They are true annuals, they produce seed easily, they self-sow so reliably that you often only need to sow once, and they come in a spectacular range of soft blush, rose, and deep cerise pinks. If you are in a warmer climate (USDA zones 8–10), Iceland poppies (Papaver nudicaule) give you cool-season color in the salmon-pink range. Oriental poppies are worth growing if you want a permanent perennial, but truly pink-flowered cultivars are harder to source and they do not produce seed as readily for saving.
Variety spotlight: which pink poppy should you grow?
A few varieties deserve a closer look, especially if you want to move beyond a generic seed mix and grow something specific.
Danish Flag poppy
The Danish Flag poppy (Papaver somniferum) is a bold, single-flowered breadseed type with a dramatic red bloom marked with a white cross. It is not pink itself, but it is closely related to many of the pink somniferum selections and is worth knowing if you are growing mixed breadseed patches, since cross-pollination between Danish Flag and pink forms can produce interesting offspring. It is one of the easiest breedseed varieties to grow, direct-sown in fall or early spring, and it reliably self-seeds year after year.
Gypsy flower
Gypsy flower (Cynoglossum amabile) is not technically a poppy, but it sometimes appears alongside poppies in cottage-garden seed mixes and is worth a mention for gardeners exploring that aesthetic. If you want specific cultivation steps, see our guide on how to grow gypsy flower. If you are searching for something to companion-plant with pink poppies for blue contrast, this fits the bill. It is a cool-season annual with similar sowing timing to poppies.
Hungarian Blue / breadseed poppies
Hungarian Blue is a classic breadseed poppy grown both for ornament and for its large seed pods. The flowers are a distinctive slate-blue to violet, not pink, but the plant type is identical to pink somniferum forms and all the growing instructions in this guide apply directly. If you are growing a mixed bed of breadseed poppies that includes pink selections, Hungarian Blue makes a beautiful contrast partner. Seed pods on all breadseed types are large and easy to harvest, which is one reason they are popular for seed saving.
Orange-flowering selections
Orange poppies, including some Iceland poppy varieties and certain Papaver rhoeas strains, are often sold in mixes that include pinks. If you want a pure pink patch, check the seed packet carefully and choose named pink varieties rather than mixed color blends. However, growing orange and pink poppies together in a cottage-style bed looks genuinely stunning, and the growing method is identical across all these color forms. For gardeners wanting guidance on cultivating fragrant orange blossom trees and shrubs, see a dedicated guide on how to grow orange blossom.
Planting calendar and bloom windows at a glance
| Sowing Method | When to Sow (Cool/Temperate) | When to Sow (Mild/Warm, Zones 8–10) | Expected Germination | Bloom Window |
|---|---|---|---|---|
| Direct sow (spring) | Early spring, as soon as soil can be worked (Feb–Apr) | Not ideal; soil too warm by then | 7–28 days | Late spring to early summer |
| Direct sow (fall/overwintering) | Late summer to early autumn (Aug–Sep) | October–November | Spring emergence after winter | Early to mid-spring |
| Indoors in biodegradable pots | 6–8 weeks before last frost | Oct–Nov for spring bloom | 7–28 days at 60–65°F (15–18°C) | As per transplant timing + ~8–10 weeks |
| Self-sown from previous year | Seeds drop in summer; germinate in fall or early spring | Seeds drop; germinate in fall | Variable | Consistent with parent plant timing |
The golden rule for most pink poppies is early. The earlier in spring you can get seed onto a prepared bed, the better. Cool soil around 60–65°F (15–18°C) is the sweet spot for germination. Seeds that go in when soil is still cold will sit quietly and then pop when the temperature rises, which is completely normal. Fall sowing in mild climates (zones 8–10) gives you the earliest possible spring blooms because the seeds experience natural freeze-thaw cycles over winter that encourage germination without any intervention from you.
Site selection and bed preparation
Pink poppies need full sun, meaning at least six hours of direct sunlight per day. They will tolerate light afternoon shade in very hot climates, but in most temperate gardens more sun equals more blooms. Avoid low-lying spots that collect standing water after rain: poppies form a single deep taproot, and waterlogged soil will rot it quickly. A gentle slope or a raised bed with natural run-off drainage is ideal.
Wind is worth thinking about. Taller varieties of Papaver somniferum can reach 3–4 feet and will snap in strong wind without support. If your garden is exposed, choose a spot near a fence or hedge that breaks the worst gusts, or plan to stake plants as they grow (more on that below). A sheltered south-facing bed is the classic setup for a productive poppy patch.
Prepare the bed a week or two before sowing. Remove weeds thoroughly because poppy seedlings are tiny and easily outcompeted in the early stages. Rake the soil to a fine, crumbly tilth: large clods and surface debris make it hard to achieve the light seed-to-soil contact that these surface-sown seeds depend on. If your soil has not been amended recently, work in a few inches of compost and rake it level before you sow.
Soil requirements and amendments
Poppies prefer a well-drained, fertile loam with a pH of around 6. Acta Horticulturae / ISHS, agro‑technology notes on poppy (soil texture, pH 6.2–6.8) recommends well‑drained, fertile loam and reports an optimum soil pH of about 6.2–6.8; avoid waterlogged heavy soils blank" rel="noopener noreferrer">Acta Horticulturae / ISHS — agro‑technology notes on poppy (soil texture, pH 6.2–6.8). 0–7.0, with the sweet spot sitting between 6.2 and 6.8. If your soil is very sandy, it will drain too fast and seedlings can dry out quickly during germination. Add compost to improve water retention. If your soil is heavy clay, drainage is the bigger risk: mix in coarse grit or perlite alongside compost to open up the texture. A quick soil test before you amend is always worth it, especially if you have had poor results with flowers in the past.
Poppies do not need highly fertile soil, but they do respond well to moderate fertility. A base dressing of balanced general-purpose fertilizer (or well-rotted compost worked in at preparation time) gives seedlings a good start. Avoid fresh manure, which can be too high in nitrogen and encourage leafy growth at the expense of flowers. The fertilizer timing that really matters comes later, once seedlings are thinned and before flowering begins (see the watering and feeding section below).
How to direct sow pink poppies step by step
Direct sowing is the method I recommend for almost everyone because poppies genuinely dislike having their roots disturbed. Here is exactly how to do it.
- Prepare your bed to a fine tilth and water it the day before sowing so the surface is evenly moist but not wet.
- Mix your poppy seed with a small amount of dry horticultural sand (roughly one part seed to four parts sand). This is the single most important trick: poppy seeds are so tiny that without sand you will almost certainly sow them too thickly, leading to a dense mat of seedlings that is miserable to thin.
- Broadcast the sand-seed mixture evenly across the prepared surface. Do not dig furrows or make rows; just scatter the mix as you would salt a dish.
- Press the seed gently into the soil surface using the flat of your hand, a piece of board, or the back of a rake. Do not rake over the seed or add a covering of soil. Maximum depth is 1/16 to 1/8 inch (about 1.5–3 mm), and many gardeners simply press the seed flush with the surface. These seeds need light to germinate.
- Water in gently with a fine rose or mist setting. Avoid a heavy stream that displaces the seeds.
- Mark the area clearly so you do not accidentally disturb it while waiting for germination.
- Keep the seedbed evenly moist until seedlings appear. Do not let the surface crust over and dry out in the first two weeks.
Fall vs spring sowing
In cool and continental climates (USDA zones 3–7), early spring sowing as soon as the soil can be worked is the standard approach. In mild winter zones (zones 8–10), sow in late summer or early autumn, between August and September. Fall-sown seeds experience natural winter temperature fluctuations that help break any residual dormancy and they tend to produce earlier, more robust plants in spring. There is no need for any special pre-chilling treatment when you time the sow correctly: the season does the stratification for you.
Starting seeds indoors
I will be honest: direct sowing is better for poppies, and if you have the option, use it. But if your spring is very short or you want a head start, you can start seeds indoors with one critical rule: use biodegradable pots (coir or paper) that you plant whole into the ground. Do not try to knock seedlings out of plastic cells or trays. The taproot forms quickly and even a gentle disturbance can set plants back significantly or kill them.
Start seeds indoors six to eight weeks before your last expected frost date. Surface-sow two or three seeds per biodegradable pot, press them in, and do not cover. Keep pots at around 60–65°F (15–18°C). Once seedlings emerge, thin to the strongest one per pot by snipping the extras at soil level rather than pulling them. When nighttime temperatures are consistently above 40°F (4°C) and seedlings have four to six true leaves, harden them off for a week by bringing the pots outside for progressively longer periods. Then plant the entire biodegradable pot directly into the prepared bed at the same depth it was growing. Water in well and do not disturb the root zone.
Germination expectations and early care
Expect germination in 7–28 days, with about 14 days being typical when soil is at the ideal 60–65°F (15–18°C) range. In colder soil, germination slows down but the seeds are usually fine; they are just waiting for the right temperature. In warmer soil above about 70°F (21°C), germination rates tend to drop, which is one reason summer sowing in hot climates rarely works well.
The very first thing that emerges is a pair of tiny, oval seed leaves (cotyledons). These look nothing like poppy leaves yet. Do not panic or assume you have the wrong plant. The distinctive ferny true leaves appear next. Your main job during this phase is moisture management: keep the surface consistently moist but never waterlogged. A fine watering can rose or a gentle mist spray works better than a heavy-flow hose at this stage.
Spacing, thinning, and grouping
Thinning is the step most beginners skip, and it is also the step that makes the biggest difference to plant quality. Crowded poppies compete for light and nutrients, produce smaller flowers, and are more vulnerable to disease. When seedlings reach about 2 inches (5 cm) tall and have their first true leaves, begin thinning.
- For general ornamental borders: thin to 6–8 inches (15–20 cm) apart.
- For large, showy peony-flowered or laciniatum types grown for big blooms or pods: thin to 12 inches (30 cm) apart to allow full development.
- For cutting gardens where you want maximum stem production: a final spacing of 6 inches (15 cm) in rows 12 inches (30 cm) apart works well.
- For seed production: more space per plant means bigger pods and higher seed yield; aim for the 12-inch spacing.
Thin by snipping unwanted seedlings at soil level with small scissors rather than pulling them, which can disturb the roots of neighboring plants. Thin in two passes: a first rough thinning when seedlings are small, then a final thinning once you can clearly see which plants are strongest. For a natural-looking border drift, group remaining plants in loose clusters of three to five rather than evenly spaced rows.
Watering, feeding, and routine care
Once seedlings are established and thinned, poppies are relatively undemanding. Aim for about 1 inch (25 mm) of water per week during dry spells, either from rainfall or supplemental irrigation. Water at the base of plants rather than overhead to reduce the risk of fungal issues. Avoid soggy soil at all costs: poppies will tolerate short dry spells far better than waterlogged roots. If your soil drains slowly, raise the bed or improve drainage before sowing next year.
For feeding, a light sidedress of nitrogen fertilizer after thinning and before flower buds form gives plants a boost at exactly the right moment. A practical approach is to apply 1–2 tablespoons of a high-nitrogen fertilizer such as a 21-0-0 formulation per 10 feet of row, following the label rate. Alternatively, a balanced granular fertilizer at standard rates works well for ornamental growing. Do not overfeed: too much nitrogen produces lush, floppy foliage and delays or reduces blooming. One feed at the bud stage is usually sufficient for the entire season.
Staking and support for tall poppies
Shorter varieties (under 18 inches / 45 cm) rarely need staking. Taller breadseed poppies and oriental poppy hybrids can reach 3–4 feet and will lean or topple after heavy rain or in exposed positions. The best time to stake is early, when plants are actively growing and before they reach their full height. Use bamboo canes and soft garden twine or purpose-made wire plant supports (the ring-on-legs type works especially well for clumping forms). Loop twine loosely around each stem rather than tying tightly, leaving room for natural movement. Alternatively, push a few twiggy branches into the soil around the seedlings early in the season and let the plants grow through them for invisible natural support.
Deadheading, cutting for bouquets, and encouraging rebloom
Deadheading spent flowers on annual poppies (Papaver rhoeas and somniferum types) can extend the blooming period modestly by preventing the plant from putting energy into seed production. That said, if you want to save seed or allow self-sowing for next year, leave some pods to mature. The practical approach is to deadhead the first flush of flowers to encourage more blooms, then let the last flush go to seed.
For cutting, timing is everything. Harvest poppy stems when the bud is just beginning to show color and is still enclosed in its papery calyx, or at most when it has just started to open and the petals are still partially folded. Cut in the early morning with sharp, clean scissors or snips. Immediately sear the cut end of the stem in a flame (a candle works perfectly) for about five seconds, then plunge into cool, deep water for several hours before arranging. This sealing step stops the milky latex from leaking, which would otherwise shorten vase life. Expect cut poppies to last three to five days in a vase with fresh water changed every day.
Harvesting and saving poppy seed
For breadseed and ornamental poppies, seed maturity comes roughly 80–90 days after planting, with pods typically ripening in mid to late summer. Phenology / time to bloom & seed maturity: seed poppy (P. somniferum) typically flowers in late spring to early summer when sown early; seed/capsule maturity and harvest often occur ~80–90 days after planting (flower → pod → dry seed mid‑ to late‑summer) Utah State Univ. Extension — Seed Poppy in the Garden (harvest timing) notes seed maturity typically occurs about 80–90 days after planting.. A ripe pod changes from green to tan or light brown, feels leathery or papery to the touch, and makes an audible rattling sound when you shake it. These are your cues to harvest.
- Choose a dry day for harvesting. Moisture in the pod at harvest can lead to mold in storage.
- Cut or snap the stem below the pod and invert the pod over a paper bag, then shake vigorously to release the seeds.
- Alternatively, cut the dried pods and thresh them by rubbing between your palms over a clean sheet of paper.
- Spread harvested seeds on a dry tray or piece of paper and allow to air-dry indoors for one to two weeks before storing.
- Store seeds in a labeled paper envelope or a small glass jar with a tight lid, kept in a cool, dark, dry location.
- Repeat the harvest every six to eight days as additional pods ripen and dry on the plant.
- Plan to use saved seed within one year. Poppy seeds lose viability relatively quickly compared to many other flowers, so freshness matters.
Troubleshooting common problems
| Problem | Likely Cause | Quick Fix |
|---|---|---|
| Poor or patchy germination | Seed buried too deep, soil too warm, or old seed | Re-sow shallowly (surface press only); sow in cooler weather; use fresh seed |
| Leggy, stretched seedlings | Insufficient light or sown too thickly | Thin promptly; ensure full sun; if indoors, move to a brighter spot |
| No blooms despite healthy foliage | Too much nitrogen, heat stress, or very late sowing | Reduce feeding; ensure sowing was early enough; add a dilute balanced feed |
| Floppy, collapsing stems | Overcrowding, too much nitrogen, or wind exposure | Thin to correct spacing; stake early; shelter from wind |
| Seedlings damping off at soil level | Overwatering and poor air circulation | Reduce watering; improve drainage; increase spacing; avoid overhead watering |
| Plants dying after flowering in summer | Normal annual lifecycle or summer heat die-back (for perennials) | Expected behavior; collect seed and prepare for next season |
Pests and diseases to watch for
Slugs and snails
These are the biggest threat to poppy seedlings, especially in cool, moist spring weather. Seedlings can disappear overnight. Use iron phosphate slug pellets (which are safe around pets and wildlife), or set beer traps near the seedbed. Scratching a thin layer of grit or crushed eggshell around seedlings provides a physical deterrent. Going out at night with a torch to hand-pick slugs is tedious but genuinely effective.
Aphids
Aphids cluster on new growth and flower buds, particularly in warm, dry spells. A strong jet of water knocks them off effectively in most cases. For persistent infestations, insecticidal soap spray applied in the early morning is a reliable organic option. Avoid broad-spectrum insecticides, which will also harm beneficial insects like hoverflies that naturally control aphid populations.
Fungal issues: powdery mildew and downy mildew
Powdery mildew appears as a white powdery coating on older leaves, usually later in the season as plants age. It looks dramatic but is rarely fatal to annuals that are already near the end of their life cycle. Improve air circulation by thinning properly and avoid wetting foliage in the evening. Downy mildew, which appears as yellowing on upper leaf surfaces with grey fuzz underneath, is more problematic in cold, wet springs. Copper-based fungicide spray can help but the best prevention is good drainage and spacing.
Root rot
Root rot is almost always a drainage problem rather than a disease problem. If plants are wilting despite moist soil, check the base of the stem and roots for brown, mushy tissue. There is no treatment once rot sets in: remove affected plants, improve drainage, and avoid watering the area until it dries out. Prevention through well-prepared, freely draining soil is the only reliable strategy.
Safety and legal notes for breadseed poppies
Papaver somniferum, the breadseed or opium poppy, is the species at the center of most legal considerations. Under U.S. federal law (21 U.S.C. §802), Papaver somniferum is defined as an opium poppy, and the term 'production' includes planting and cultivation. The seed itself is explicitly excluded from this definition, which is why seed packets are legally sold. In practice, growing P. somniferum ornamentally for seeds and decoration is widely tolerated across the United States, and extension services in many states publish guides on growing it. However, harvesting the latex from unripe pods (the raw material for opium) is clearly illegal under federal law and is not something any home gardener should be doing. State and local laws vary, and it is worth checking your specific jurisdiction before growing large quantities. If you are concerned about legal ambiguity, Papaver rhoeas (Shirley poppies) delivers beautiful pink blooms with none of the regulatory complexity.
On the safety side: the milky latex that seeps from cut stems and unripe pods contains alkaloids that can cause skin irritation in some people. Wear gloves when handling large quantities of fresh stems or pods, and wash your hands after working with any poppy plants. Keep children and pets away from large quantities of freshly harvested latex-rich material.
Quick reference cheat sheet for beginners
| Task | Specification |
|---|---|
| Sowing depth | Surface sow or maximum 1/16–1/8 inch (1.5–3 mm); seeds need light to germinate |
| Sowing technique | Mix seed with dry sand; broadcast thinly; press in; do not rake over |
| Sowing time (cool climates, zones 3–7) | Early spring as soon as soil can be worked (February–April) |
| Sowing time (mild/warm climates, zones 8–10) | Late summer to early autumn (August–September) |
| Germination temperature | 60–65°F (15–18°C) optimum; expect 7–28 days |
| First thinning | When seedlings reach 2 inches tall, thin to 2–3 inches apart |
| Final spacing (borders/cutting) | 6–8 inches (15–20 cm) |
| Final spacing (large varieties / seed production) | 12 inches (30 cm) |
| Watering | ~1 inch (25 mm) per week; keep evenly moist; avoid waterlogging |
| Fertilizing | 1–2 tablespoons high-nitrogen fertilizer per 10 ft of row after thinning, before flowering |
| Bloom window | Late spring to early summer (spring-sown); early spring (fall-sown) |
| Days to bloom from sowing | Approximately 60–90 days |
| Seed harvest timing | When pods are tan, papery, and seeds rattle (roughly 80–90 days after sowing) |
| Seed storage | Cool, dark, dry; use within 1 year for reliable germination |
| pH | 6.0–7.0 (ideal 6.2–6.8) |
| Sun requirement | Full sun (minimum 6 hours direct sunlight) |
FAQ
What are the best pink poppy types for a home cutting garden and how do annual vs perennial types differ?
Common garden pinks: Papaver somniferum (breadseed/opium poppy) — true annual with large showy flowers and seed pods; Papaver rhoeas (corn/Shirley poppy) — true annual, lighter weight plants and profuse flowering; Papaver nudicaule (Iceland poppy) — short‑lived perennial/long‑flowering in cool climates; Papaver orientale (Oriental poppy) — herbaceous perennial, large spring flowers but foliage dies back after bloom. Choose P. somniferum or P. rhoeas for quick, tall cutting stems and seed pods; choose P. orientale for bold spring color in a perennial border; choose Iceland poppies for extended cool‑season blooms. Note variety differences: peony‑type/’double’ forms make fuller bouquets but may set fewer seeds; single forms often give more stems and pods for seed harvest.
When should I sow pink poppy seed (exact calendar guidance by temperate region)?
Temperate/cool climates (zones ~3–7): surface‑sow as soon as soil can be worked in early spring (Mar–May) for spring/early summer blooms. Mild/warm winter climates (zones ~8–10): sow late summer to early autumn (Aug–Sep) to overwinter seedlings and bloom earlier next spring. If starting indoors (less recommended) sow 4–6 weeks before last frost and keep in cool conditions; transplant only in biodegradable pots to avoid root disturbance.
How deep and how densely should I sow pink poppy seeds?
Always surface‑sow. Tiny seeds need light to germinate—do not bury. Options: broadcast seed mixed with fine sand for even distribution and press lightly into the seedbed, or scatter and press. If covering, use ≤1/16–1/8 in (≈1.5–3 mm) of fine soil only. For spacing: broadcast thinly and then thin seedlings to 4–6 in (10–15 cm) apart for seed/strong plants; for larger floral specimens or peony‑flowered varieties allow ~12 in (30 cm) between plants.
What germination timing and soil temperature should I expect?
Expect seedlings in roughly 7–28 days depending on soil temperature and moisture — ~2 weeks typical. Target soil temperature ~60–65°F (15–18°C) for fastest germination; cooler soils slow emergence. Keep the surface evenly moist (not soggy) during this period.
Should I start poppy seeds indoors or always direct‑sow?
Direct sowing into final position is strongly preferred because poppies form a deep taproot and tolerate root disturbance poorly. If you must start indoors, use individual biodegradable pots or peat pellets and plant the pots whole to avoid disrupting roots. Keep indoor start cool and transplant when seedlings have 2–3 true leaves and ground conditions are suitable.
How and when should I thin seedlings and what final spacing should I use?
Thin when seedlings have their first true leaves. For plants intended for seed production or vigor, thin to 4–6 in (10–15 cm) between plants. For larger flowers/bouquets allow 8–12 in (20–30 cm). Remove extras by snipping at soil level rather than pulling to avoid disturbing neighboring roots.
Next Article
How to Grow Gypsy Flower at Home: Step-by-Step Guide
Step-by-step guide to grow gypsy flower at home from seed, including sowing, care, troubleshooting, and bloom timing.