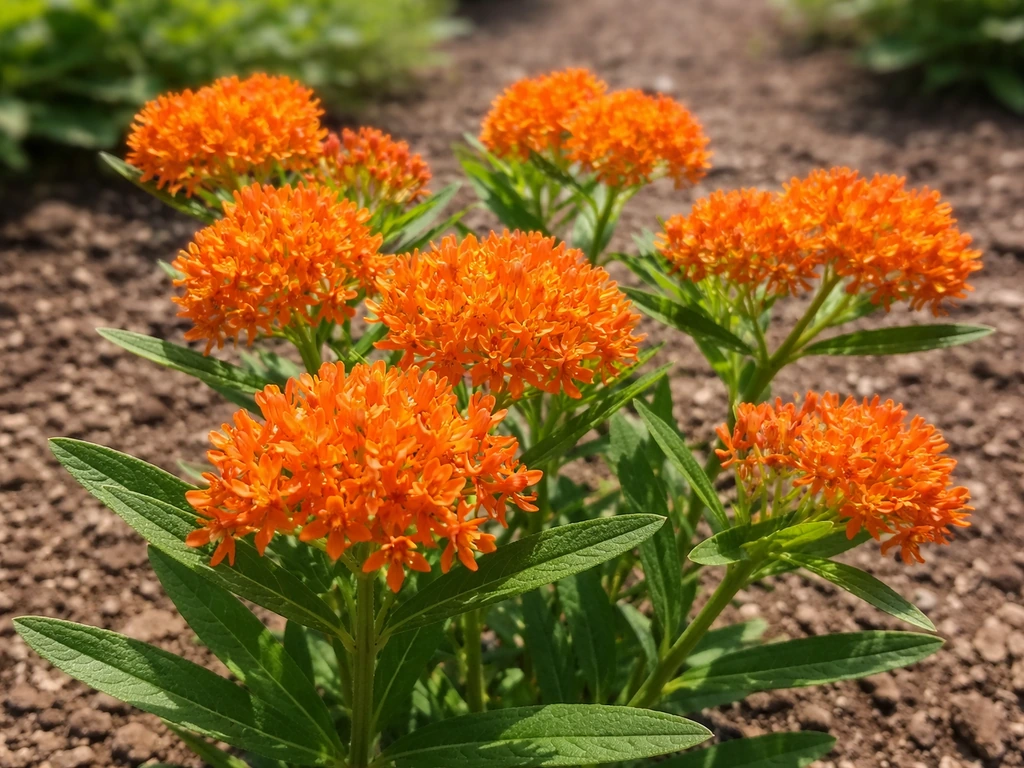
Butterfly weed (Asclepias tuberosa) grows best in full sun and well-drained soil, started from seed either indoors 7 to 9 weeks before your last frost or direct-sown outdoors in fall or early spring. The USDA Plants Database notes that Asclepias tuberosa (butterfly weed) is blank" rel="noopener noreferrer">easily propagated from seed. The seeds need cold stratification (about 30 days at 40°F) to germinate reliably, and once the plants are in the ground, they are genuinely low-maintenance: drought-tolerant, pest-resistant enough to ignore most seasons, and rewarding pollinators from midsummer through fall. This guide walks you through every step, from prepping your seeds to collecting pods at the end of the season.
How to Grow Butterfly Weed From Seed to Bloom

Marcus Holloway
25 Apr 2026
What butterfly weed actually needs to thrive
Get the site right and butterfly weed takes care of itself. Get it wrong and you will fight the plant all season. There are really only two hard rules: full sun and good drainage.
- Sun: at least 6 to 8 hours of direct sun daily. Butterfly weed is a prairie native that genuinely needs heat and light to flower well. Part shade produces weak, stingy blooms.
- Soil drainage: this is non-negotiable. Wet feet cause root rot and will kill a plant that would otherwise live for decades. Sandy or loamy soil is ideal. Heavy clay needs to be amended or raised before planting.
- Soil fertility: butterfly weed actually prefers lean, unimproved soil. Rich, heavily amended beds push leafy growth at the expense of flowers. Skip the compost if your soil is already average.
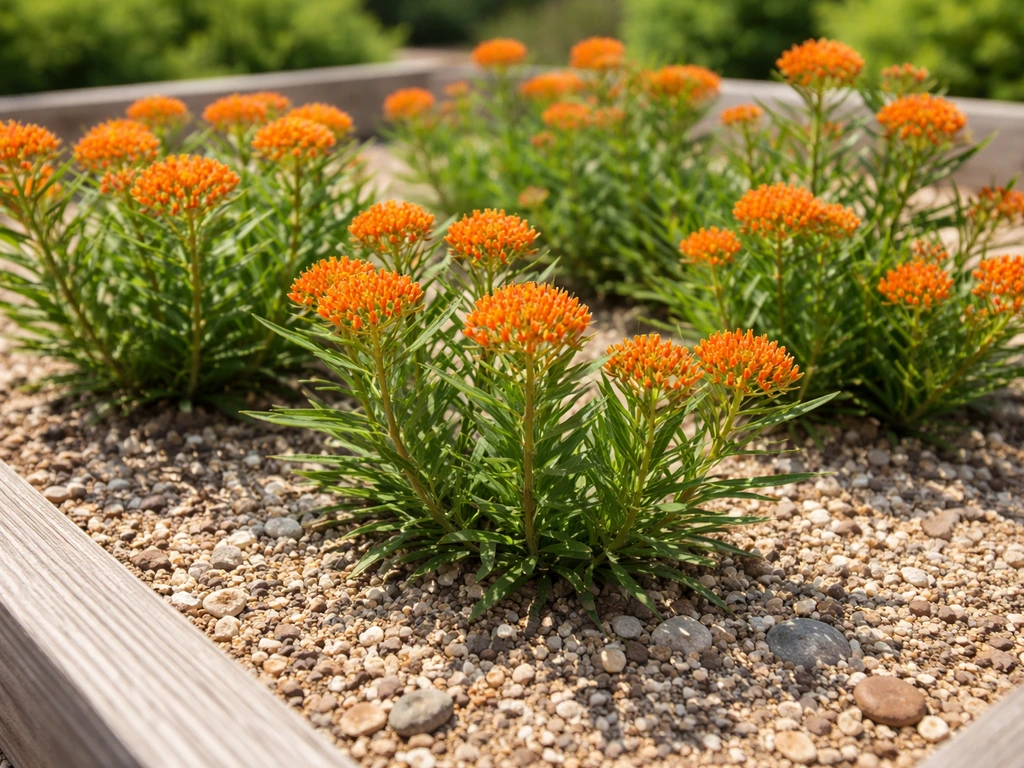
- Spacing: plant 15 to 18 inches apart minimum. If you want room for clump expansion and good air circulation (which reduces disease), spacing up to 24 inches is better.
- Site prep: loosen the soil 12 inches deep before planting. Because butterfly weed grows a deep taproot, compacted soil will stunt it early and make future division almost impossible.
If you are gardening in a spot with clay-heavy soil, your best option is a raised bed or a large container (at least 12 inches deep) filled with a fast-draining potting mix. Container plants dry out faster, which butterfly weed actually appreciates, but you will need to water a little more consistently during the first establishment season.
Direct sow or start indoors? Picking the right method
Both methods work. The choice comes down to your climate, your patience, and whether you want flowers this first season or are happy waiting until next year.
| Method | When to sow | Pros | Watch out for |
|---|---|---|---|
| Start indoors | 7 to 9 weeks before last frost | Flowers possible in year one; more control over germination conditions | Taproot grows fast, so transplant on schedule or roots get pot-bound |
| Direct sow in fall | After first frost, before ground freezes | Seeds stratify naturally over winter; no indoor setup needed | Slow, unpredictable spring emergence; seeds can wash away or get eaten |
| Direct sow in spring | As soon as soil can be worked (or after stratifying seeds in fridge) | Simple; no transplant shock risk | Without cold treatment, germination is often poor or very slow |
My recommendation for most beginners: start indoors. You control the stratification, germination happens in a warm room where you can watch it, and you get seedlings into the ground at the right time. Fall direct-sowing is a close second if you want zero fuss and are not in a hurry for blooms.
How to germinate butterfly weed seeds
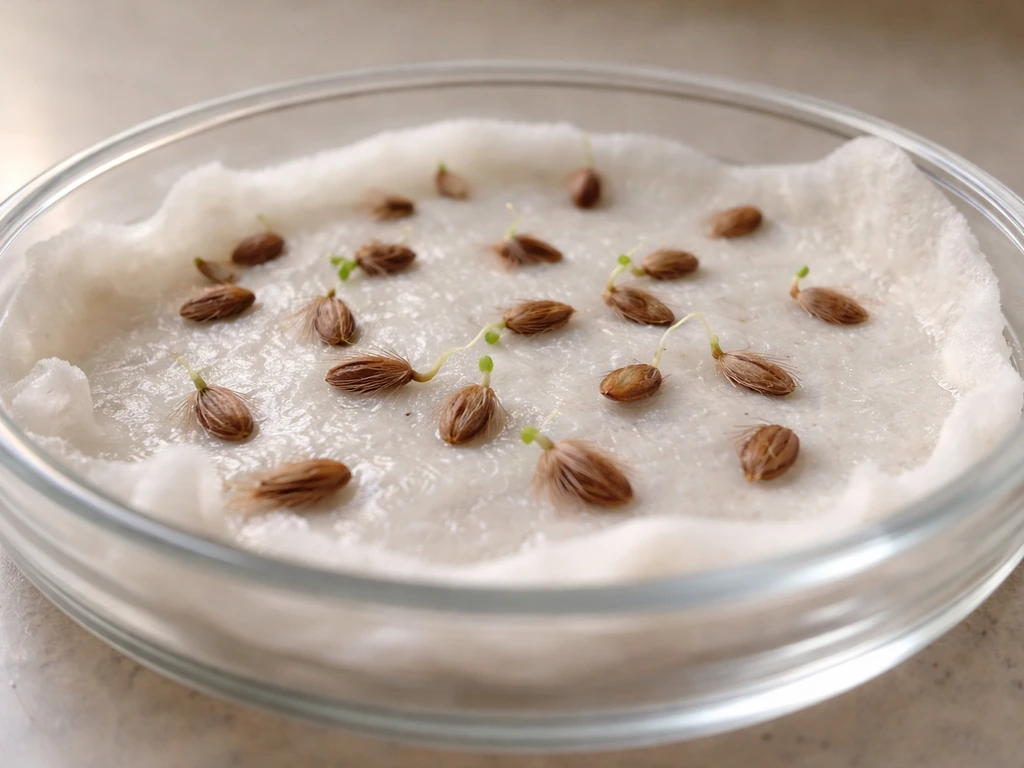
Cold stratification: the step most people skip (and then wonder why nothing sprouted)
Butterfly weed seeds need a cold, moist period before they will germinate. The USDA NRCS propagation protocol for butterfly milkweed (Asclepias tuberosa) calls for cold stratification first, then moving trays to germination conditions after the cold period. This mimics winter in their native habitat and breaks dormancy. Skipping this step is the single most common reason for poor germination. Aim for 30 days of cold stratification at a minimum; some growers go 60 days and report slightly better results, but 30 days is enough to get a solid germination rate.
- Dampen a paper towel or small amount of seed-starting mix until it holds moisture but does not drip.
- Place seeds in a small zip-lock bag with the damp medium.
- Label the bag with the date and variety.
- Store in your refrigerator (not freezer) at around 40°F for 30 to 60 days.
- After the cold period, soak seeds in warm water for 24 hours before sowing. This softens the seed coat and speeds germination.
If you are fall direct-sowing, you skip all of this because the ground does it for you over winter. That is the elegant part of fall sowing.
Sowing depth and timing
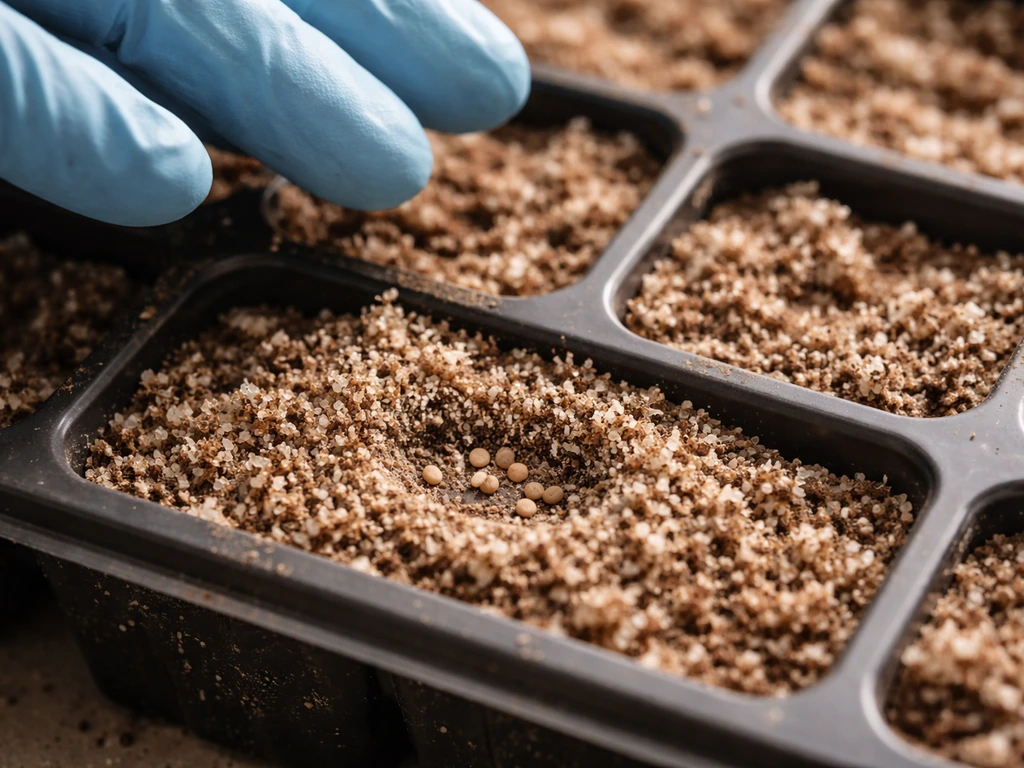
Sow seeds 1/4 inch deep into seed-starting mix. Do not use garden soil in trays. Garden soil compacts, drains poorly in containers, and can carry pathogens that cause damping-off. A sterile seed-starting mix keeps conditions clean and manageable. After stratification and a 24-hour warm soak, bring the seeds into a warm room (65 to 70°F) to germinate. You should see seedlings emerge in 1 to 2 weeks under good conditions.
Sowing indoors and transplanting into the garden
Starting seeds indoors
- Fill individual cells or small biodegradable pots with sterile seed-starting mix. Individual cells reduce root disturbance at transplant time, which matters a lot with butterfly weed's taproot.
- Sow one or two seeds per cell at 1/4 inch depth. Cover lightly and press down gently.
- Water to keep the mix moist but never soggy. Soggy conditions invite damping-off, a fungal problem that collapses seedlings at the soil line. If you see seedlings tipping over and rotting at the base, that is damping-off. Prevention is easier than cure: use new sterile mix, water carefully, and make sure trays have drainage.
- Place trays in a warm, bright spot or under grow lights. A windowsill with strong southern exposure works if you do not have lights.
- Thin to one seedling per cell once they reach about an inch tall. Snip the weaker one with scissors rather than pulling, which disturbs the roots of the keeper.
Transplanting without wrecking the taproot
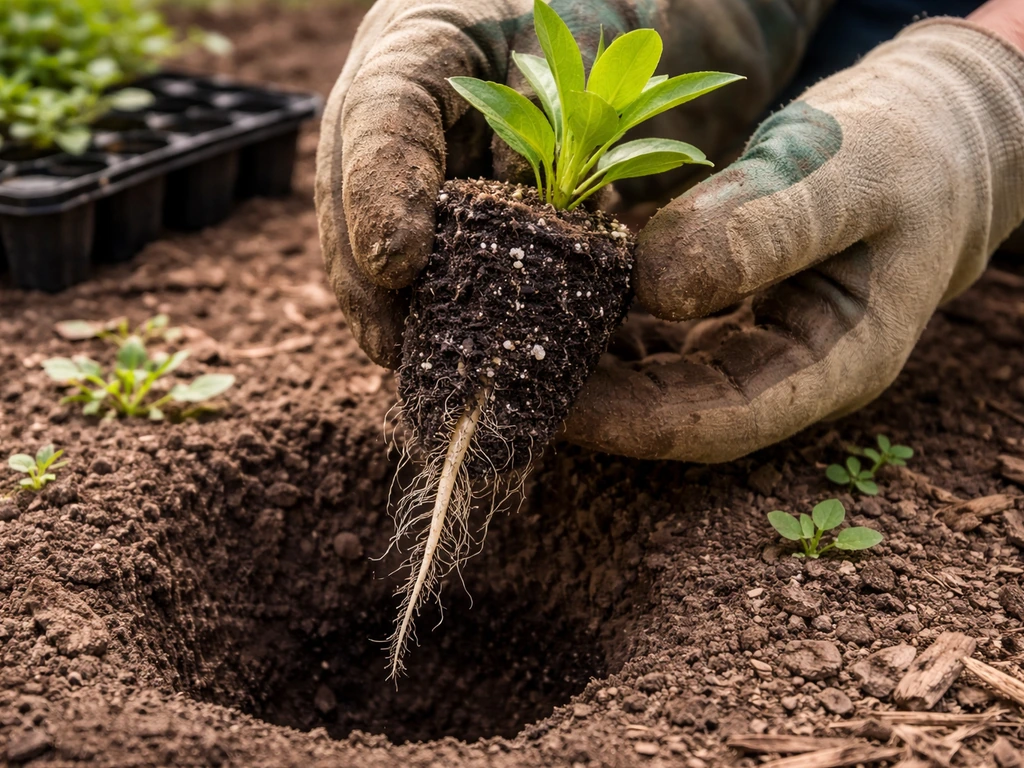
Butterfly weed forms a strong taproot early and resents disturbance. Do not leave plugs sitting in trays too long after they sprout. For a quick comparison with another timing approach, see butterfly plants how to grow before you choose whether to sow indoors or direct-sow. The window for transplanting without stress is roughly 7 to 9 weeks after indoor sowing, which should line up with your last frost date. Harden seedlings off for 5 to 7 days by setting them outside in a sheltered spot for increasing amounts of time before planting in the ground.
When you plant, handle the root ball gently and do not try to loosen or spread the roots. Drop the plug into a prepared hole, firm the soil around it, and water in. Once established, do not divide or move butterfly weed unless absolutely necessary. It can take a full season or two to recover from transplant stress.
Watering and fertilizing: less is genuinely more
During establishment (first season)
For the first few weeks after transplanting, water regularly to keep the soil evenly moist while the taproot is establishing. This is the one phase where butterfly weed actually needs consistent moisture. Check every few days, especially in warm or windy weather. Do not let newly transplanted seedlings dry out completely before the taproot is deep enough to fend for itself.
Once established
Once butterfly weed has been in the ground for a full season and the taproot is established, step back. This plant is genuinely drought-tolerant and prefers drying out between waterings. Overwatering is a far more common problem than underwatering. Water deeply once every week or two during dry spells. In average rainfall summers, you may not need to water at all after the first year.
On fertilizer: skip it, or use it very sparingly. Butterfly weed thrives in lean soil, and too much nitrogen pushes lush leaves with few flowers. If your soil is genuinely poor (sandy, depleted), a single light application of a low-nitrogen balanced fertilizer in early spring is plenty. In average garden soil, no fertilizer at all is the right call.
Seasonal care from planting to first bloom
One thing to know upfront: butterfly weed is famously slow to emerge in spring. It is one of the last perennials to break dormancy, sometimes not showing green until late May or even June depending on your climate. Do not panic and do not dig it up assuming it is dead. Mark the spot clearly in fall so you do not accidentally disturb the crown over winter or early spring.
- Weeding: keep the area around young plants clear, especially in year one when seedlings are small. Once butterfly weed fills in and the taproot is deep, it competes well on its own.
- Heat: butterfly weed loves summer heat and will slow down or stall in cool, cloudy conditions. This is a plant that hits its stride in July and August.
- Staking: not needed. Butterfly weed has strong, upright stems that support themselves without any help.
- Deadheading: after the first flush of blooms, cutting spent flower clusters off can push a second round of blooms about a month later. It is worth doing if you want to extend the display.
- Deadheading for seed: if you want to collect seeds (more on that below), leave some spent flower heads to develop into seed pods and do not cut them off.
First-year plants sometimes do not bloom at all, especially if started from seed. Year two and beyond is when butterfly weed really shows off. Set that expectation now and you will not be disappointed.
Troubleshooting common problems
Seeds not sprouting
If germination is slow or patchy after sowing stratified seeds, give it a full two weeks before worrying. If nothing has emerged by then, check whether the seeds actually completed a full cold period and whether the growing medium is staying moist but not wet. Seeds that were too dry during stratification or that dried out after sowing often fail. Resow with a fresh batch of properly stratified seeds.
Leggy seedlings
Leggy, stretched seedlings are almost always a light problem. Move trays closer to a light source or increase daily light exposure to at least 14 to 16 hours under grow lights. Leggy seedlings can be planted a little deeper at transplant time to compensate, but it is better to fix the light conditions early.
Plant not flowering
The most common causes of poor flowering are too much shade, overly rich soil, or the plant simply being in its first year. Check that it is getting full sun and that you have not over-fertilized. A young plant that struggles to bloom in year one almost always explodes with color in year two once the taproot is fully established.
Pests and disease
Aphids are the most common pest on butterfly weed, and they can appear in large colonies on the stems and undersides of leaves. Two species in particular (Aphis gossypii and Aphis nerii) are associated with milkweeds. For light infestations, a strong blast of water knocks them off effectively. For heavier problems, insecticidal soap or horticultural oil are the least disruptive options, especially if you want to protect the pollinators and monarch butterflies visiting the plant. If you are growing butterfly weed specifically as a host plant for monarchs, be cautious about any pesticide application.
Disease-wise, butterfly weed can get rust (reddish-orange spots on leaves) and leaf spot. Neither is typically serious enough to threaten the plant. Rust spreads in humid conditions, so good spacing and air circulation are the best prevention. Remove heavily affected leaves and avoid overhead watering. Leaf spot diseases look alarming but rarely cause lasting harm.
Root rot and damping-off
Both of these problems come down to too much moisture. Root rot on established plants is almost always caused by poorly draining soil. If a plant collapses suddenly in mid-season, check the root zone: mushy, dark roots indicate rot. There is no saving a badly rotted plant, but you can prevent it entirely by planting in well-drained soil and avoiding prolonged wet conditions. Damping-off in seedlings is prevented with sterile seed-starting mix, good drainage in trays, and careful watering.
After the season ends: seeds, overwintering, and what comes next
Collecting seeds
Butterfly weed produces distinctive elongated seed pods that split open in late summer and fall to release seeds attached to silky white fluff (similar to milkweed, which it is closely related to). Watch the pods carefully because once they open, the seeds disperse quickly on the wind. Harvest pods when they start to turn tan and are just beginning to crack. Lay them in a paper bag in a dry room and let them finish opening naturally. Store seeds in a sealed envelope in a cool, dry place until you are ready to stratify them for next season.
Overwintering
Butterfly weed is a hardy perennial in USDA zones 3 to 9, so in most of the continental US it needs no special winter protection. Cut stems back to a few inches above the ground after they die back in fall, or leave them standing over winter for structure and wildlife habitat and cut them in early spring before new growth appears. Mark the crown location clearly because, again, spring emergence is late and it is easy to damage the crown accidentally.
Planning next season
If you want more plants, start seeds from your saved pods in late winter using the same stratification process described above. Butterfly weed also self-seeds modestly if you allow pods to open naturally, so you may find volunteer seedlings nearby the following spring. These can be left in place or carefully transplanted when they are still very small (before the taproot goes deep). If you are interested in growing other native pollinator plants alongside butterfly weed, milkweed for monarchs is a natural companion that follows a very similar care approach. If your goal is monarchs, you can also use the milkweed for monarchs guide to pick the right species and planting timeline.
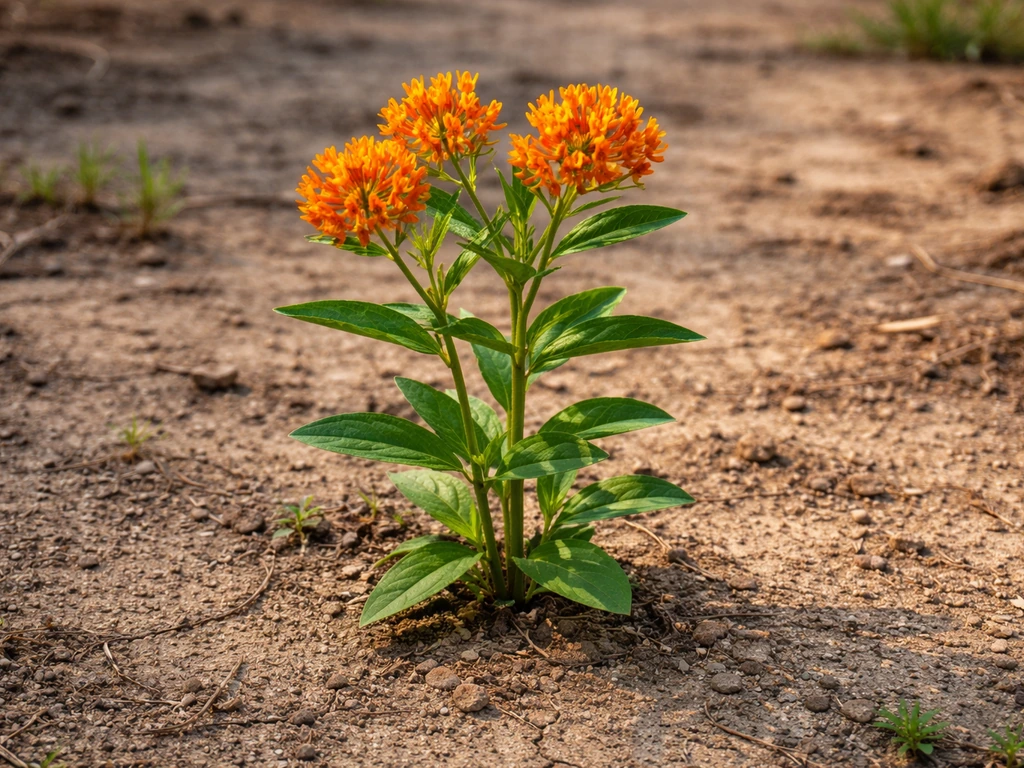
Stick with it through year one and you will have a plant that basically manages itself for years. The taproot anchors it through drought, the lean soil preference means less work, and the late-summer orange blooms are genuinely one of the best shows a low-effort perennial bed can produce. If you are specifically after a white-flowering buttercup, tailor your variety choice and planting conditions to that species so you get the right blooms. Butterfly pea flowers are grown very differently, but you can still apply the same mindset of matching the plant to your site conditions late-summer orange blooms.
FAQ
If my stratified butterfly weed seeds do not sprout, what should I troubleshoot first?
Yes, but treat it as a seed-batch issue, not a plant issue. If you do not get germination, verify the seeds actually completed the full cold period (they must stay moist, not drying out). Then resow in fresh seed-starting mix and wait the full two weeks before deciding the batch is failing.
How do I grow butterfly weed in containers without killing it from too much water?
For containers, prioritize drainage depth and potting mix quality over size. Use a fast-draining mix and pick a container at least 12 inches deep, then water more often only during establishment. After that, let the surface dry slightly between waterings to avoid rot.
What spacing should I use to reduce rust and leaf spot problems?
Space plants to allow airflow, especially because rust shows up in humid conditions. A common mistake is overcrowding when seedlings look small, then later having wet, shaded foliage. Give young plants room early so the mature clumps are not tight.
My seedlings are getting leggy, should I plant them deeper or change something else?
Start with the correct light timing: if seedlings go leggy, the fix is more light immediately, not later. Move trays closer to the light source and aim for 14 to 16 hours of light per day (or the closest you can manage). Planting them deeper helps a little, but light is the real cure.
When is the best time to harvest butterfly weed seed pods, and what if they seem to ripen unevenly?
If you see orange pods, but they do not tan before splitting, stop assuming “ready soon.” Pods can continue to mature unevenly, so harvest by color plus first-crack timing. Let pods that just start turning tan finish opening indoors in a paper bag.
If butterfly weed self-seeds, how do I decide whether to keep volunteers or pull them?
Save pods from healthy plants, but remember that volunteer seedlings can appear even if you did not plan for it. If monarch-hosting is your goal, you can keep volunteers that match your preferences, but avoid moving established volunteers too late because the taproot forms quickly.
Can I divide butterfly weed to make more plants, or is transplanting better?
Butterfly weed is best divided very sparingly because the taproot does not like disturbance. If you must move a patch, do it when plants are still tiny and the taproot is not deep, otherwise plan on a slow recovery or possible failure.
My plants bloomed poorly in year one, what can I do differently to get flowers sooner?
Expect little or no bloom in the first year, especially from seed. The quickest way to increase year-two flowering is to keep the site full sun, avoid nitrogen-rich fertilizer, and focus on establishment water during the first few weeks, then scale back.
What is the safest way to control aphids if I am growing butterfly weed for monarchs?
If monarchs are visiting, avoid broad-spectrum insecticides. For aphids, start with the least disruptive option, a strong water spray, then use insecticidal soap or horticultural oil only when needed and follow the label carefully to minimize harm to pollinators.
How can I tell whether a dying butterfly weed is root rot, and what should I change for the next planting?
If a plant collapses suddenly, treat it as a drainage problem before anything else. Check the root zone for mushy, dark roots, then correct soil conditions going forward (raised bed or amended fast-draining soil). There is no reliable cure once root rot is established.
Next Article
How to Grow Marigolds from Dried Flowers Step by Step
Learn how to grow marigolds from dried flowers: extract viable seeds, test germination, sow correctly, then grow strong
