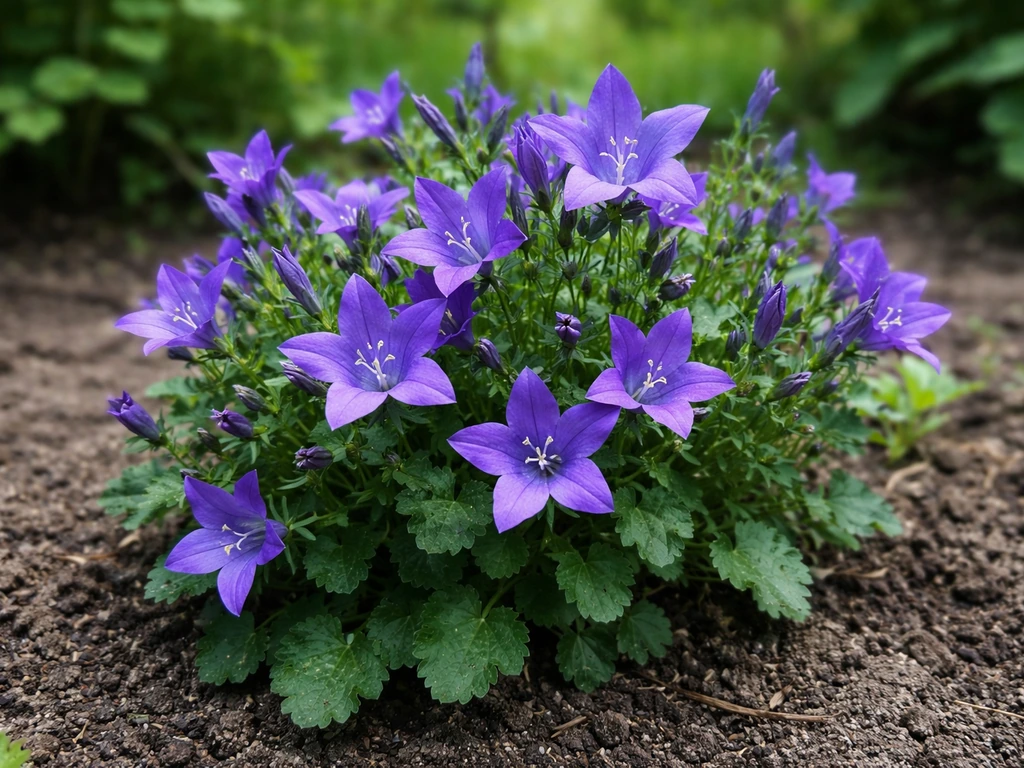
Bellflowers (Campanula) are genuinely rewarding to grow, and most beginners can get them from seed to bloom without too much fuss. Cat’s eye flowers are grown a bit differently than bellflowers, so it helps to follow crop-specific tips for soil, light, and watering. Sow seeds indoors 8 to 10 weeks before your last frost date, press them onto the surface of moist seed-starting mix without covering them (blank" rel="noopener noreferrer">they need light to germinate), keep the tray at around 65 to 68°F, and expect sprouts in 7 to 14 days. From there, it's a matter of giving them decent drainage, enough sun, and a little patience, most perennial types bloom in their second year, while Canterbury bells can flower the first season if started early enough.
How to Grow Bellflowers: Step-by-Step Care From Seed
Choosing the right bellflower type
The Campanula genus is huge, and picking the wrong type for your space is the most common beginner mistake. Here are the four you'll most often find as seed or starts at garden centers, and the honest difference between them:
| Type | Habit | Height | Annual/Perennial | Best for |
|---|---|---|---|---|
| Campanula carpatica (Carpathian bellflower) | Compact mound | 6–12 inches | Hardy perennial | Borders, edging, containers |
| Campanula portenschlagiana (Dalmatian bellflower) | Mat-forming, trailing | 4–6 inches | Evergreen/semi-evergreen perennial | Rock walls, hanging baskets, ground cover |
| Campanula medium (Canterbury bells) | Upright clump | 18–36 inches | Biennial (grown as annual) | Cottage gardens, cutting gardens |
| Campanula latifolia (Giant bellflower) | Tall clump-forming | 3–5 feet | Hardy perennial | Back of borders, naturalistic gardens |
For most beginners, Campanula carpatica is the safest starting point. It stays compact, blooms reliably with upward-facing blue, purple, or white bells, and tolerates a range of conditions without drama. If you want something that cascades over a wall or spills from a pot, Campanula portenschlagiana is beautiful and nearly indestructible. Canterbury bells (C. medium) are the ones you'll see in traditional cottage gardens with those big, saucer-based flowers, just know they're biennials, so they bloom in their second year unless you start them very early. Giant bellflower is stunning but needs space and is better once you've got some experience.
When to plant and seed-starting timeline
Timing really does make or break your bellflower season. The standard advice is to sow seeds indoors 8 to 10 weeks before your last expected frost date. If you're in USDA Zone 6 and your last frost falls around April 15, that puts your indoor sowing around early to mid-February. For Canterbury bells specifically, sowing in late winter or early spring gives them enough time to bulk up for a strong first-season showing, though technically they're biennials and will flower most heavily in year two.
If you missed the indoor window, you can direct sow outdoors once temperatures consistently stay above 50°F, or start seeds in a coldframe in spring. Germination will be slower and less controlled outdoors, but it works. Perennial types like C. carpatica will still establish well from a late spring sowing, they just won't flower much until the following year, which is completely normal.
- Count back 8 to 10 weeks from your last frost date — that's your indoor sowing target.
- For Canterbury bells (biennial), sow by late winter to get blooms the same growing season.
- For perennial types (C. carpatica, C. portenschlagiana), late-winter to early-spring indoor sowing is ideal.
- Outdoor direct sowing is possible once soil temps are reliably above 50°F (usually after last frost).
- Plants sown outdoors or late may not bloom until their second season — plan for it.
How to sow bellflower seeds indoors and outdoors
Starting indoors
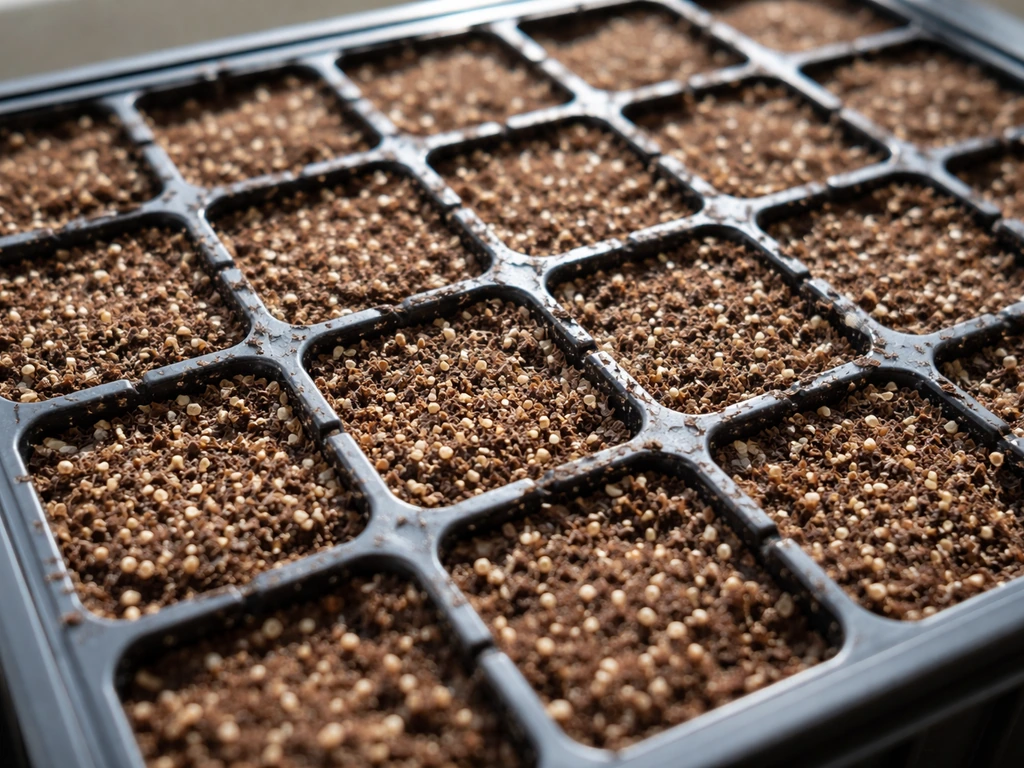
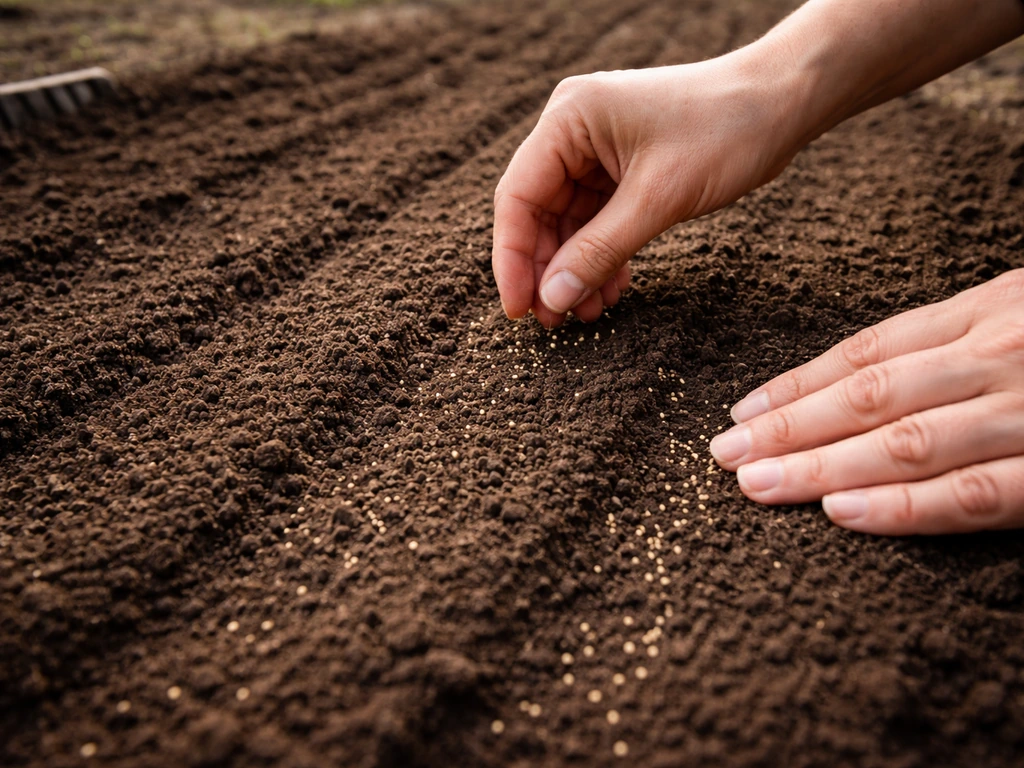
Bellflower seeds are tiny, and they need light to germinate, this is the single most important thing to get right. Do not bury them. Here's how to do it step by step:
- Fill a plug flat or seed tray with fresh, sterile seed-starting mix. Never use garden soil — it compacts and carries pathogens.
- Moisten the mix thoroughly before sowing so it's evenly damp but not waterlogged.
- Scatter seeds thinly across the surface. Campanula seeds are dust-fine, so mix them with a pinch of dry sand first to help distribute them evenly.
- Press seeds gently onto the surface with your fingertip or the bottom of a glass. Do not cover with more mix.
- If you want to help retain surface moisture without blocking light, dust a very thin layer of fine vermiculite over the seeds — just enough to see through.
- Mist the surface very lightly with a spray bottle or bottom-water by setting the tray in a shallow dish of water. Never pour water directly from above or you'll wash seeds into clumps.
- Cover the tray with a clear plastic dome or plastic wrap and place under grow lights or in a bright, warm spot (65–68°F is the sweet spot).
- Check daily. As soon as you see green, remove the cover and keep lights close — about 2 to 3 inches above seedlings — to prevent stretching.
At the right temperature, most bellflower seeds germinate in 7 to 14 days. Some specialist or wild-collected Campanula seeds can take up to 90 days, so don't give up on a tray that looks slow, just keep it consistently moist and warm.
Direct sowing outdoors
For outdoor sowing, wait until after your last frost and prepare a fine, weed-free seedbed. Rake the soil smooth, scatter seeds thinly, and press them into contact with the soil surface, again, no covering. Water gently with a fine rose head or misting nozzle. Mark the spot clearly because bellflower seedlings are tiny and easy to weed out by mistake. Keep the area consistently moist until germination, then thin to the recommended spacing once seedlings have a couple of true leaves.
Soil, light, and watering requirements
Soil
Good drainage is non-negotiable for bellflowers. Chocolate lace flower grows best with the same bellflower basics, especially in well-drained soil and bright light so the plants do not suffer from rot. They'll tolerate a range of soil types, but they absolutely cannot sit in waterlogged ground, crown rot and root rot are the main killers, and both come from excess moisture. Aim for well-drained, moderately fertile soil. If your garden soil is heavy clay, work in grit or coarse horticultural sand before planting. A slightly alkaline to neutral pH (around 6.5 to 7.5) suits most Campanula species. For alpine types like C. portenschlagiana, gritty, lean soil actually produces better, more compact plants than rich, amended beds.
Light
Most bellflowers are happiest in full sun to light shade. C. carpatica handles partial shade well and actually appreciates some afternoon shade in hot climates (anything consistently above 85°F). C. medium and C. latifolia prefer more sun. As a general rule: the more sun they get (within reason), the more flowers you'll see. In deep shade, plants get leggy and bloom sparsely.
Watering
Water regularly until plants are established, usually the first four to six weeks after transplanting. After that, most perennial bellflowers are moderately drought-tolerant and only need supplemental watering during dry spells. The golden rule is to water deeply and then let the top inch of soil dry out before watering again. To check moisture in pots, push your finger 2 to 3 cm into the soil: if it feels damp, hold off. Overwatering is far more dangerous than underwatering with this genus.
Transplanting, spacing, and managing growth
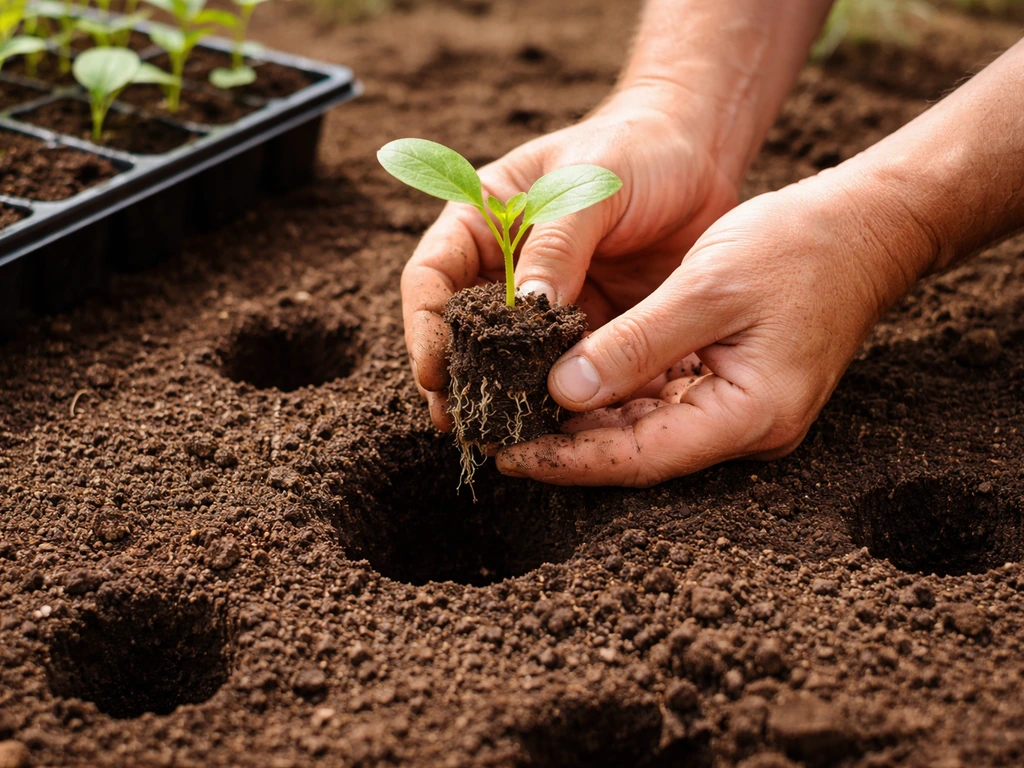
Transplant seedlings outdoors after the risk of frost has passed and they have at least two sets of true leaves. Harden them off first by setting the tray outside in a sheltered spot for a few hours a day over 7 to 10 days, gradually increasing exposure. This step matters, soft indoor seedlings moved straight outside can wilt badly or set back weeks.
When planting out, dig a hole just deep enough to match the root ball and no deeper. This is the big one: do not bury the crown. The crown, where the stems meet the roots, needs to sit at or just above soil level. Burying it invites rot, which is one of the most common beginner pitfalls with bellflowers.
Spacing depends on species. C. carpatica needs about 12 inches between plants. C. portenschlagiana spreads as a mat, so give it 12 to 18 inches and it will fill in. Taller C. latifolia wants at least 18 to 24 inches. After about three years, perennial clumps tend to get crowded and bloom less. The fix is simple: dig up the clump in spring or autumn, pull or cut it into smaller sections (each with a few good growing points), and replant. Divided plants sometimes skip a bloom year while they settle in, so set your expectations accordingly.
Fertilizing, deadheading, and encouraging more blooms
Feeding
Bellflowers don't need heavy feeding. In fact, too much nitrogen pushes leafy growth at the expense of flowers. A balanced, slow-release granular fertilizer worked into the soil at planting is usually enough. For established plants, a light top-dressing of balanced fertilizer or compost in early spring is all they need. In containers, a diluted liquid feed every three to four weeks through the growing season keeps things ticking over without overdoing it.
Deadheading
Deadheading is one of the easiest ways to extend your bellflower display significantly. Pinch or snip off individual spent flowers, or cut entire faded flower spikes back to just above the next bud or leaf. For some varieties, particularly C. medium, cutting back spent spikes can trigger a second flush of blooms. If you want plants to self-seed (and bellflowers can self-seed quite enthusiastically), leave a few spent spikes on the plant. Just be prepared to manage the seedlings the following season so they don't crowd out their neighbors.
After the main flowering season ends, cutting perennial plants back close to the ground helps tidy them up and can encourage a fresh basal rosette for the next season. It's a light maintenance job that pays off in plant health and appearance.
Common problems and troubleshooting
Leggy seedlings
If your seedlings are tall, pale, and floppy, they're not getting enough light. Bellflowers need bright light immediately after germination. Move trays under grow lights (2 to 3 inches above seedlings, 14 to 16 hours a day) or to the sunniest windowsill you have. You can't fully reverse leggy growth, but giving more light fast will stop it getting worse. Next time, get the lights on the moment you see sprouts.
Damping-off
Damping-off is where seedlings suddenly keel over at soil level, often wiping out a whole tray overnight. It's caused by water molds like Pythium and Phytophthora, and it thrives in warm, wet, stagnant conditions. The prevention is simple: always use sterile seed-starting mix (not garden soil), never overwater, don't sow too thickly, and make sure there's some airflow around the tray. If you're seeing it happen, remove the plastic dome, space out any crowded seedlings, and let the surface dry slightly between waterings.
Crown and root rot
In established plants, crown rot and root rot are usually caused by waterlogged soil or a buried crown. If a plant suddenly collapses or looks slimy at the base, check the drainage situation first. Improve soil drainage by working in grit or raising the planting level slightly. Fusarium crown rot can also affect bellflowers in wet conditions, there's no cure once a plant is badly affected, so remove it and don't replant Campanula in the same spot for a few seasons.
Poor germination
If seeds aren't germinating, the most likely culprits are: seeds were covered with too much soil (blocking the light they need), the temperature is too cold or too inconsistent, or the seeds are old (Campanula seed viability drops off after a year or two). Try again with fresh seed, a consistent 65 to 68°F heat source, and a surface sow.
Pests
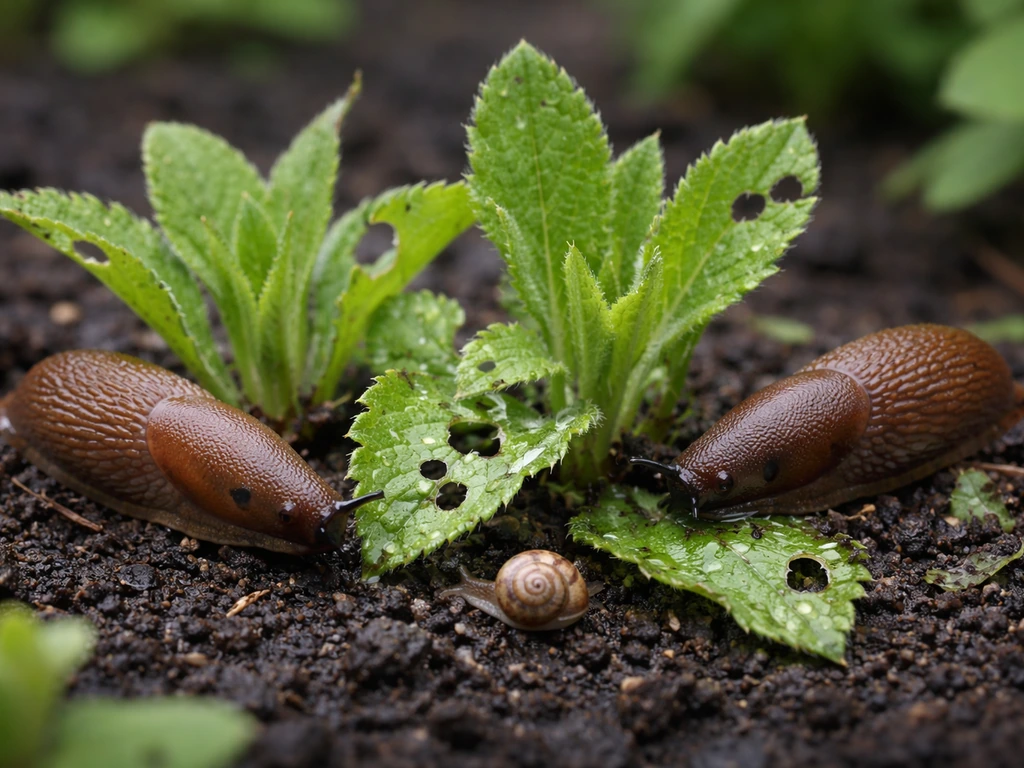
Slugs and snails are the most common pest problem, particularly on young plants and the soft growth of mat-forming types like C. portenschlagiana. Deal with them using your preferred method, iron phosphate pellets, copper tape around containers, or hand-picking at dusk. Aphids occasionally cluster on soft shoot tips but are rarely serious; a strong jet of water usually sorts them out.
Container growing and what to do after the first bloom
Growing bellflowers in containers
Bellflowers do well in containers, especially compact types like C. carpatica and trailing C. portenschlagiana. Use a well-draining potting mix, if anything, mix in extra perlite or grit to ensure drainage. Choose a pot with drainage holes (this is not optional). Containers dry out faster than garden beds, so check soil moisture more often, but resist the urge to water on a set schedule. Stick to the finger-test method: if the top 2 to 3 cm feels moist, wait. Feed with a diluted balanced liquid fertilizer every three to four weeks through spring and summer.
Overwintering containers
Hardy bellflowers like C. carpatica and C. portenschlagiana can survive winter outdoors in a container if they're well-established and the pot is large enough to buffer against temperature swings. The main risks in winter are freeze-thaw cycles heaving roots loose, waterlogged soil freezing solid, and exposure to drying winter winds. To give your pots the best chance: stop fertilizing in early autumn, cut back dead foliage after the first hard frost, move containers against a sheltered wall or into an unheated garage or shed in the coldest months (especially in Zone 5 or colder), and make sure the pot drains freely so roots aren't sitting in ice. Even in milder zones (6 and above), wrapping the pot in horticultural fleece or bubble wrap during deep cold snaps is cheap insurance.
After the first bloom: seed saving, propagation, and next season
Once your bellflowers have finished blooming, you have a few choices. If you also want to try a velvet-flower style plant, you can compare these bellflower steps with how to grow velvet flower for similar timing and care considerations. If you want more plants for free, leave a few seed heads to mature and collect the small seeds when the capsules turn papery and brown. Store them in a labeled envelope in a cool, dry place and sow them the following late winter. Alternatively, let plants self-seed in the garden, bellflowers can spread generously this way, so just be ready to thin or transplant the volunteers in spring.
For established perennial clumps that are three or more years old, division is the most reliable way to multiply your plants and keep them vigorous. Dig the clump in early spring as growth resumes, split it into sections each with healthy roots and a few growing points, and replant at the same depth. Don't be surprised if divided plants take a season to settle before flowering again, that's normal, not failure.
If you're starting today (May 2026) and you're in a temperate Northern Hemisphere climate, you've likely missed the optimal indoor sowing window for this season. If you are also trying to grow thca flower, note that timing and starting conditions are just as important for getting healthy early growth. The practical move right now is to look for nursery starts of C. carpatica or C. portenschlagiana, which should be available at garden centers. Get them in the ground or into containers this month, give them the conditions described above, and enjoy some blooms this summer. Then sow from seed next late winter to build out your collection. Then sow from seed next late winter to build out your collection, and if you are planning around a specific ornamental like how to grow chamanthi flowers, follow the same seasonal timing mindset even when the plant type differs. Bellflowers reward patience and consistency, once you've got a patch going, they're genuinely one of the easier perennials to keep thriving year after year.
FAQ
How can I prevent bellflowers from self-seeding everywhere?
If you do not want volunteers, remove spent spikes before the seed capsules fully dry. For varieties that self-seed readily, also avoid leaving a “few” spikes in areas where seedlings would be a nuisance, like near pathways or mulch beds. You can still deadhead for a repeat flush, then collect any unwanted seedlings in spring before they establish roots.
Can I grow bellflowers from seed directly outdoors even if I missed starting indoors?
Yes, but expect slower and less predictable results, because outdoor conditions fluctuate and the light requirement still applies. Use a fine seedbed, scatter thinly, press firmly, and keep the surface consistently moist with gentle watering until germination. Plan on minimal blooms the first year if you sow later than the indoor timing window.
What should I do if my bellflower seeds germinate very slowly?
Bellflower seeds often look like they are not working when they are simply delayed or too dry. Keep the seed tray surface lightly moist, do not let it fully dry, and maintain steady warmth around the mid-to-high 60s°F. If nothing sprouts after 3 to 4 weeks, check seed freshness and consider starting a new batch rather than repeatedly rewatering an older, failing tray.
My seedlings keeled over overnight, what is happening and how do I stop it?
If you see healthy seedlings but they collapse at the soil line, that is damping-off. Remove any plastic cover or dome if you have one, improve airflow around the tray, and let the surface dry slightly between waterings. Make sure you are using sterile seed-starting mix, not garden soil, and avoid crowding.
How do I water bellflowers in containers without overwatering?
Use a simple “top-of-soil” check rather than watering by calendar. Push your finger about 2 to 3 cm into the mix, if it feels damp hold off, if it feels dry water thoroughly until excess drains out. Containers dry faster and are more prone to waterlogged conditions if the potting mix compacts, so always empty saucers.
Why are my bellflowers growing lots of leaves but not many flowers?
For most types, fertilizer should be light because excess nitrogen produces leaves at the expense of blooms. If plants are lush but not flowering, cut back on feeding and switch to a lower-nitrogen balanced formula for future applications. A spring top-dressing of compost or a mild balanced fertilizer is usually enough.
What’s the right planting depth for bellflowers, and what goes wrong if I plant too deep?
Burying the crown or planting too deep is a frequent cause of rot and poor performance. When you set the plant, match the root ball depth, then confirm the crown sits at or just above the soil line. If you already planted too deep, carefully lift and replant rather than just hoping it improves.
Do bellflowers need full sun, or can I give them afternoon shade?
Yes, especially in very hot weather or if you are planting in a south-facing spot. If afternoon temperatures are persistently high, give partial shade so the plants are not stressed, and avoid planting in areas where water pools after rain. More sun can increase blooms, but the best approach is “bright light with relief” when heat is extreme.
How often should I fertilize bellflowers, especially in pots?
Most bellflowers are not heavy feeders, so the timing matters more than frequency. Start with a balanced slow-release fertilizer at planting, then apply only a light spring top-dressing for established beds. In containers, use diluted liquid feed during active growth every few weeks, and stop in early autumn to avoid tender new growth.
When should I divide bellflower clumps, and will they bloom immediately after?
If your plants are crowded after a few years, flowers often decline. Divide and replant in spring as growth resumes, or in autumn where winters are not too harsh. Plan for at least one season of settling after division, even if the plants look healthy right away.
How to Grow Marigold From Petals: What Works and What Fails
Learn why marigold petals rarely grow, plus seed and cutting steps, troubleshooting, and next-season tips for blooms.